Creamy Sausage and Spinach Lasagna

IMG_0613.jpeg

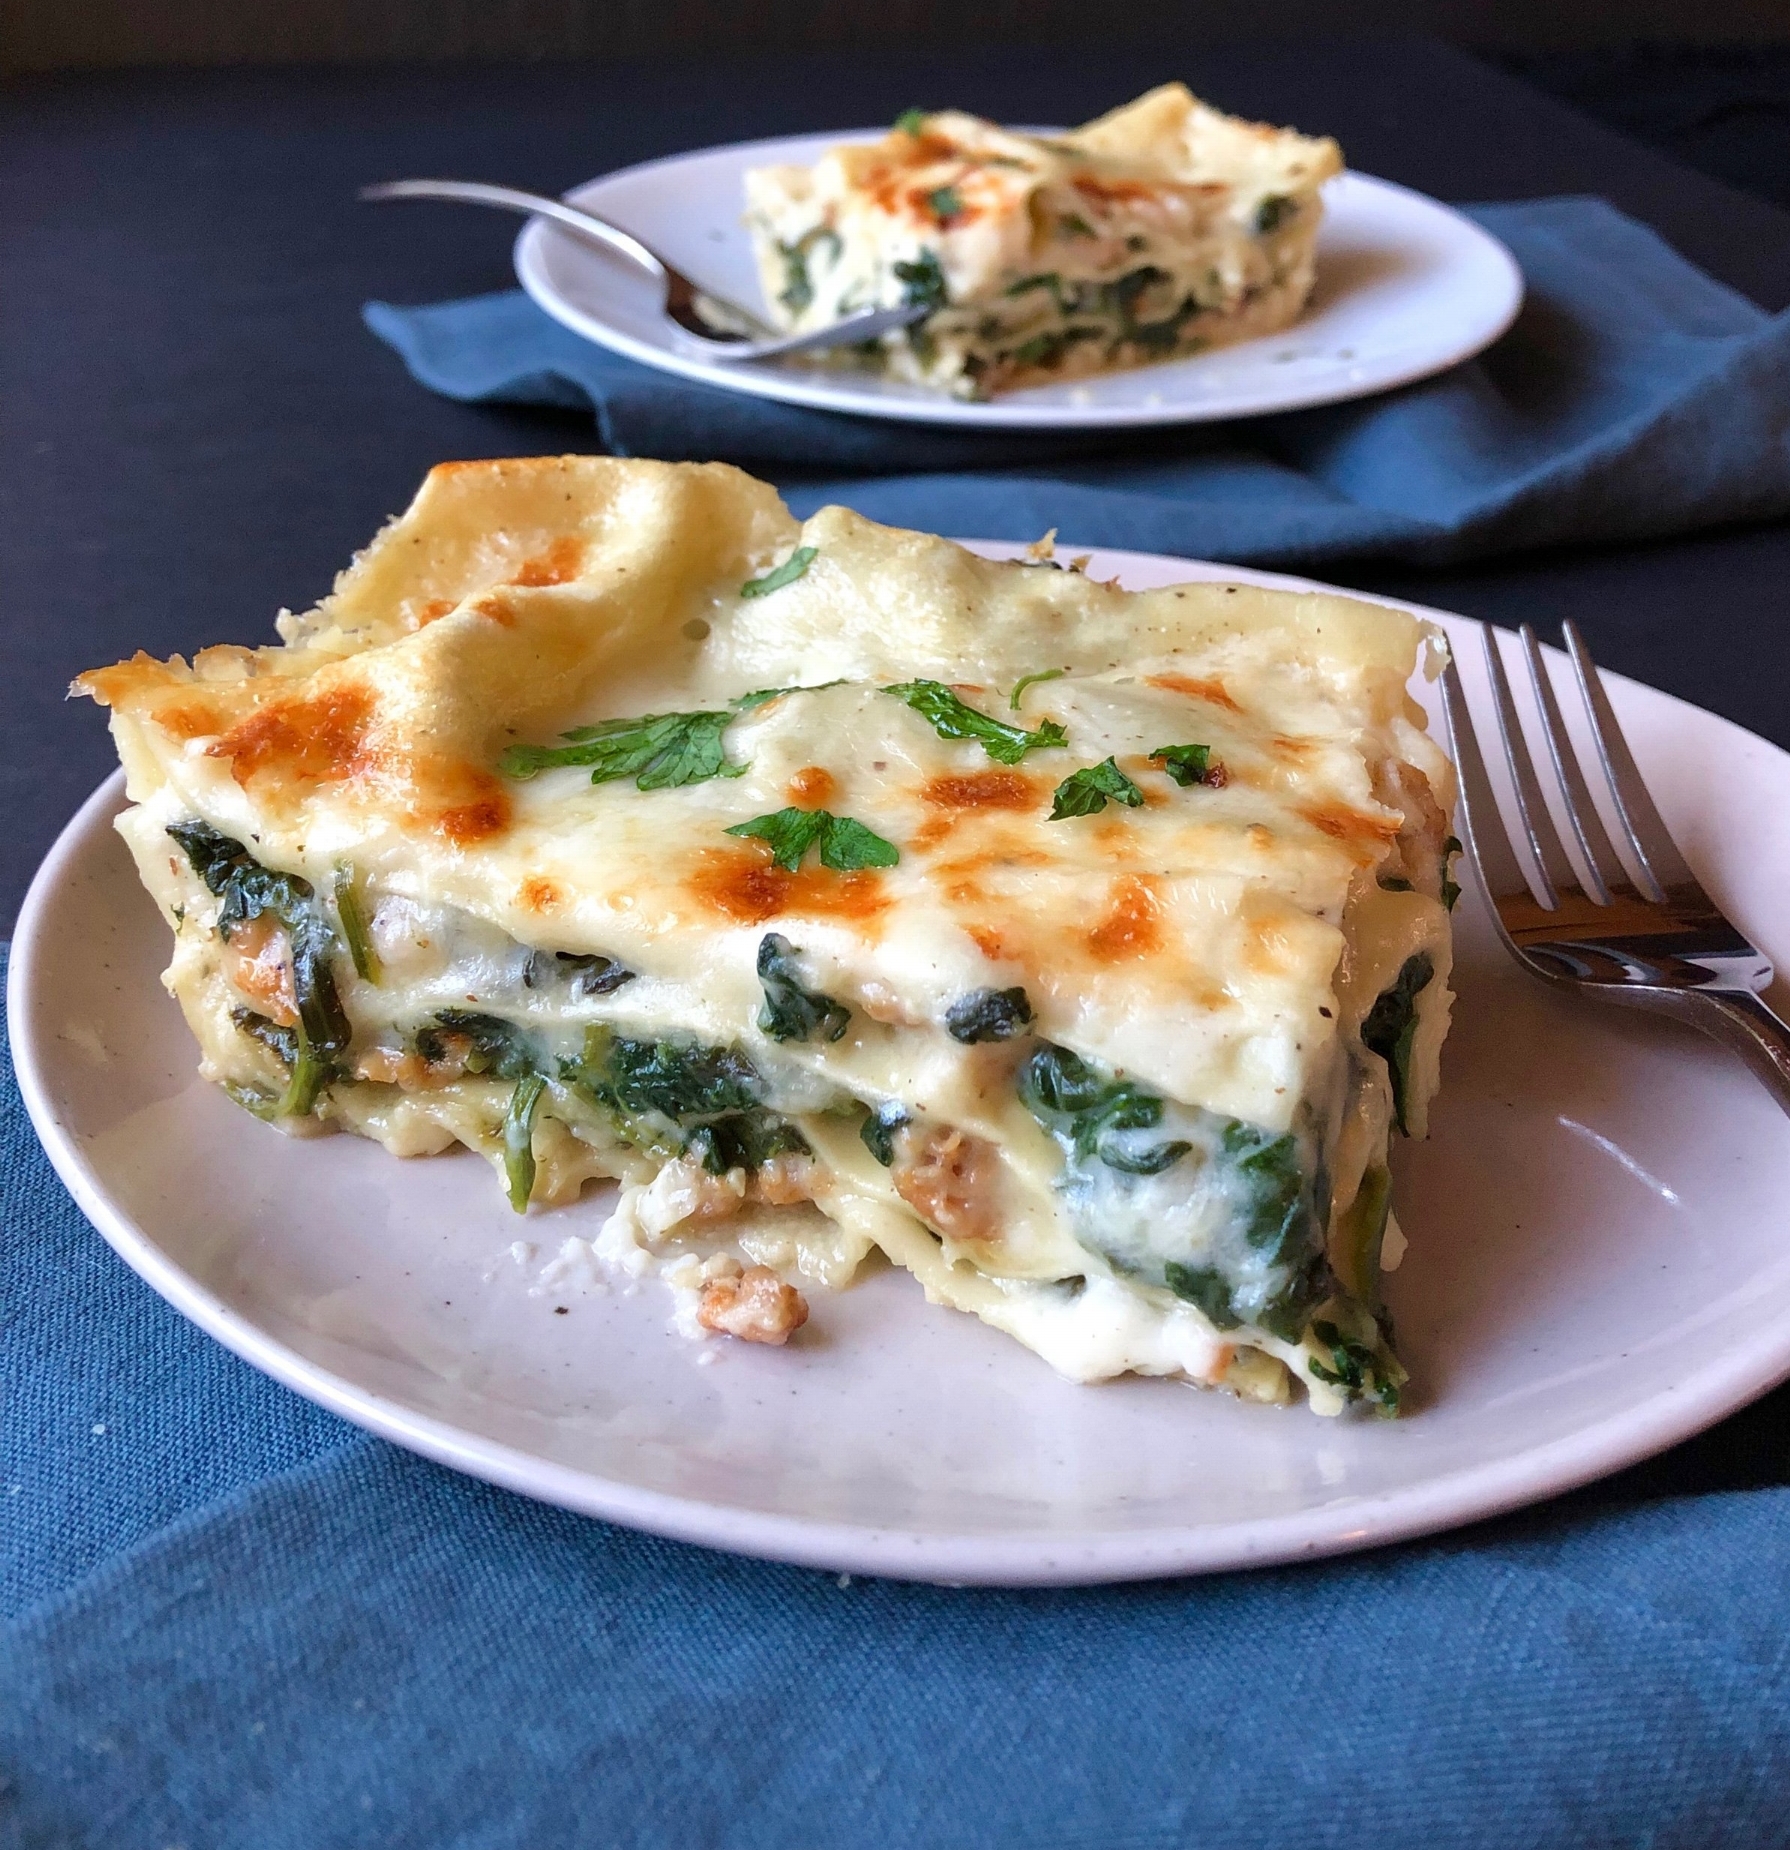
I certainly love a good red-sauce lasagna—but a creamy white-sauce version? Oh yeah, I’ll take that any day. My Creamy Sausage and Spinach Lasagna is rich and indulgent–tasting, yet clocks in at fewer than 400 calories per serving. The sauce uses a combo of flour-thickened milk and chicken stock to keep things light, and chicken Italian sausage pulls its weight, flavor-wise, without loading on calories and fat. (Scroll below recipe card for photo step-by-steps on layering.) Hooray for lasagna night!

Yield: 6 servings

Creamy Sausage and Spinach Lasagna

prep time: 35 minscook time: 42 minstotal time: 77 mins

How 'bout a plate of cheesy, starchy, creamy comfort ... that won't leave you feeling awful after you eat it? That's what this white lasagna offers. It hits all the high notes of comfort food goodness but keeps things a little lighter than the typical versions you'll see. You won't have to resign the rest of your night to recovering from lasagna, if you know what I mean. It's packed full of garlicky spinach, too, and the thin lasagna noodles do something really rather lovely—they don't soak up much sauce, so the lasagna stays creamy-wonderful. My husband, who typically doesn't like lasagna, asked to pack up leftovers to take to work the next day. But then the kids ate what would have been the leftovers. Teenagers...

ingredients:

  • 9 oz. raw chicken Italian sausage (with casings removed, about 3 links)
  • 1 Tbsp. canola oil
  • 5 garlic cloves, minced
  • 1 lb. fresh spinach
  • 1 1/2 cups 2% milk
  • 1/3 cup all-purpose flour
  • 1 cup unsalted chicken stock (such as Swanson)
  • 1 bay leaf
  • 1/2 tsp. freshly ground black pepper
  • 1/8 tsp. kosher salt
  • 2 oz. Parmigiano-Reggiano cheese, grated (about 1/2 cup packed)
  • Cooking spray
  • 8 oven-ready lasagna noodles
  • 6 oz. shredded low-moisture, part-skim mozzarella cheese (about 1 1/2 cups)
  • Chopped parsley (optional)

instructions:

  1. Preheat oven to 375°F.
  2. Heat a large nonstick skillet over medium-high heat. Add sausage to pan; cook until browned, stirring to crumble, about 5 minutes. Remove sausage from pan. (Do not wipe pan clean.)
  3. Add oil to pan; swirl to coat. Add garlic; cook 1 minute, stirring constantly. Gradually add spinach, tossing with tongs until spinach wilts, about 3 minutes total. Spoon spinach mixture into a strainer; press with back of a spoon to remove excess moisture. (Do not squeeze spinach dry in a towel, as this will make it so dry that it absorbs all of the cheese sauce. Trust me; I found out the hard way.)
  4. Combine milk and flour, stirring with a whisk until smooth. Pour milk mixture and chicken stock into skillet; add bay leaf. Bring to a boil over medium heat, stirring frequently with a whisk. Simmer until thickened. Remove from heat, and stir in pepper, salt, and Parmigiano-Reggiano cheese. 
  5. Coat an 8-inch square glass baking dish with cooking spray. Spread 1/2 cup sauce in bottom of dish. Top with 2 noodles. Sprinkle one-third of sausage over noodles, then top with one-third of spinach. Sprinkle with 1/3 cup mozzarella. Top with 1/2 cup sauce. Repeat layers twice (2 noodles, one-third of sausage, one-third of spinach, 1/3 cup mozzarella, and 1/2 cup sauce). Top final layer with remaining 2 noodles. Spread remaining sauce over noodles, and sprinkle with remaining 1/2 cup mozzarella. Cover pan with foil coated with cooking spray. Bake at 375°F for 40 minutes. 
  6. Uncover pan. Heat broiler to HIGH. Broil lasagna until browned on top, about 2 minutes. Sprinkle with parsley, if desired.

NOTES:

Calories 376; Fat 16g (sat 7g); Protein 27g; Carb 33g; Fiber 4g; Sugars 4g (added sugars 0g); Sodium 720mg
Created using The Recipes Generator

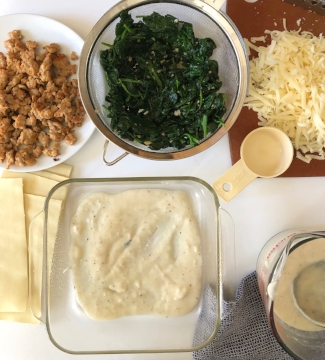
This lasagna does involve a little bit of prep: browning the sausage, wilting the spinach, making the sauce, and shredding the mozzarella (seriously, please shred it yourself from a block; it’ll melt smoother and be creamier). Before you start layering, gather all the components together:

IMG_0574.jpeg

And then rearrange them in order of the way you’ll layer them in the pan. Then spread 1/2 cup sauce in the bottom of the baking dish…

IMG_0575.jpeg

And top with two of the lasagna noodles.

IMG_0579.jpeg

Then sprinkle over one-third of the cooked sausage.

IMG_0580.jpeg

Top with one-third of the spinach.

IMG_0581.jpeg

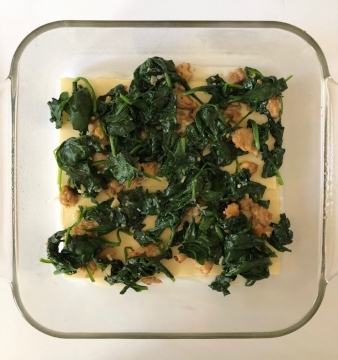
And then 1/3 cup of the mozzarella.

IMG_0582.jpeg

Spread 1/2 cup sauce over all that.

IMG_0584.jpeg

Repeat those layers twice, and then top with 2 more noodles and the rest of the sauce.

IMG_0587.jpeg

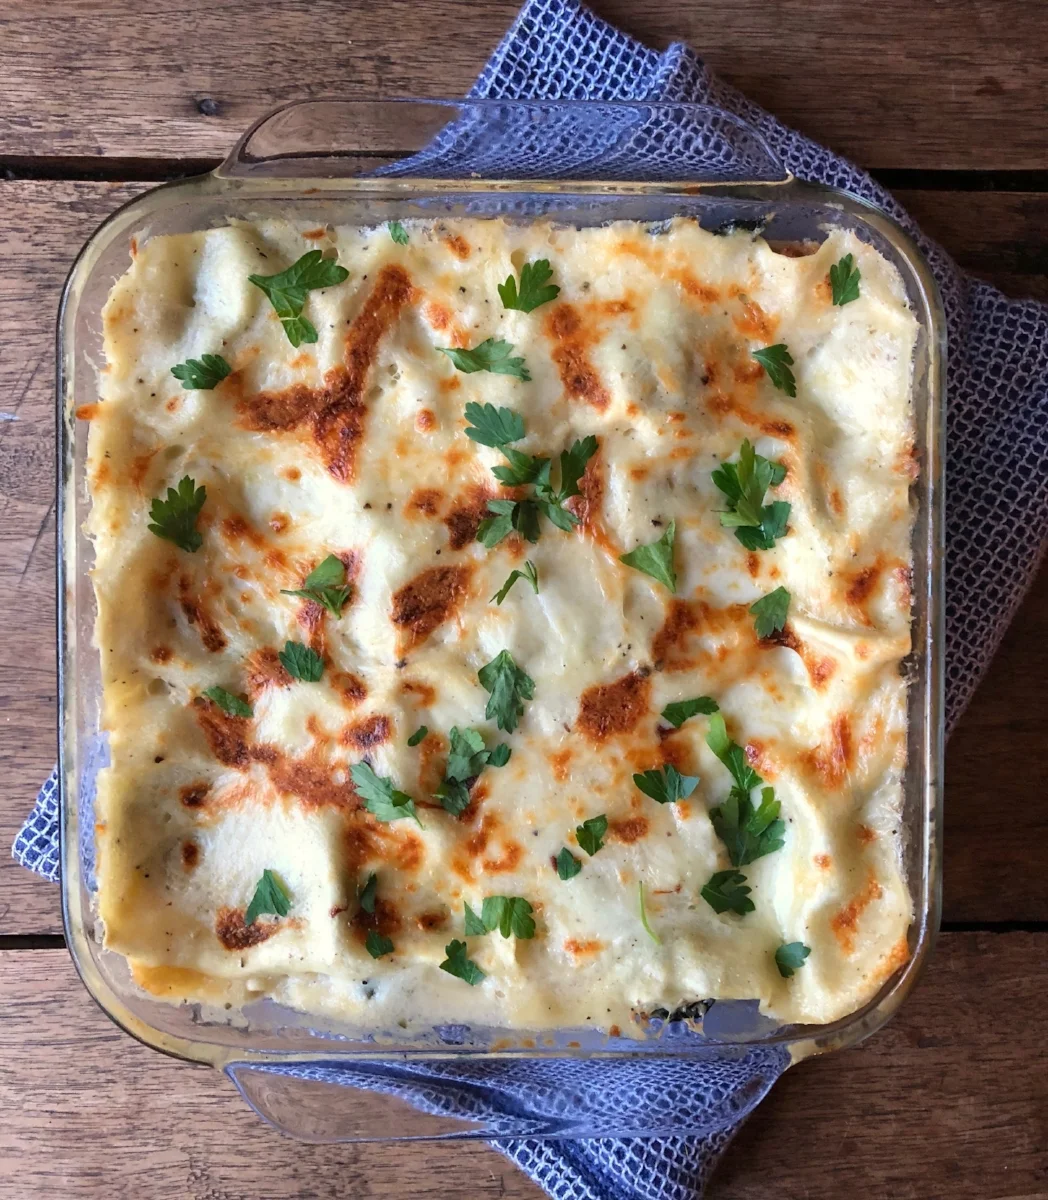
And finish with the rest of the mozzarella cheese. Then cover the dish with foil and bake at 375°F for 40 minutes.

IMG_0588.jpeg

At that point, the lasagna will be done, but just a little pale. See?

IMG_0595.jpeg

But then pop it under the broiler for a few minutes (and top with parsley), and wow—hubba hubba!

IMG_0601.jpeg

Kale Salad with Pears, Pomegranates, and Pickled Onions

IMG_0445.jpeg

Every Thanksgiving table should include a big, fresh salad. With all the rich casseroles, gravy, and savory (and sometimes surprisingly sweet) sides, something fresh is a necessity. Whenever I bust up a big salad into the Turkey Day mix, I’m often met with jokes and gentle ribbing. But you know what? My salad always gets eaten. Every freaking leaf. This is a great one for Thanksgiving or Friendsgiving because it can easily accommodate dietary needs and restrictions: It’s vegan and gluten-free, and if someone has a nut allergy, you can easily omit the pecans.

Yield: 8 (serving size: about 1½ cups)

Kale Salad with Pears, Pomegranates, and Pickled Onions

prep time: 35 minscook time: 5 minstotal time: 40 mins

I have a real problem with lame salads, those that feel like an afterthought. Salads, after all, are a great opportunity to play with texture, flavor, and color, bringing all those elements into harmonious balance. This one does just that, combining earthy-chewy lacinato kale, sweet-juicy pears, toasty-crunchy pecans, and tart-crisp pickled onions. I happened upon a bag of petite Seckel pears at my local Publix store, which I think makes this salad feel a little special—but any sweet pear will work beautifully here. You don’t have to cut them the way I did (using a mandoline); you can just quarter, core, and thinly wedge or slice them. See below for tips and technique photos.

ingredients:

  • 1 cup mirin (sweet rice wine—see photo below)
  • ½ cup natural rice vinegar
  • 1 medium red onion, vertically sliced

  • 2 (8-oz.) bunches lacinato kale
  • 3 Seckel pears or 1½ Bartlett or Anjou pears, thinly sliced
  • ½ cup pomegranate arils (about ½ large pomegranate)
  • ½ cup pecan halves, toasted
  • 6 Tbsp. extra-virgin olive oil, divided
  • 3 Tbsp. natural rice vinegar
  • 1 Tbsp. maple syrup
  • 1 Tbsp. whole-grain Dijon mustard
  • ¾ tsp. kosher salt
  • ½ tsp. black pepper
  • 1 small garlic clove, grated on a Microplane

instructions:

  1. Combine mirin and ½ cup vinegar in a small saucepan; bring to a boil. Add onion; return to a boil, and immediately remove from heat. Let stand 30 minutes or until cooled to room temperature. You can make the pickled onions a week ahead; refrigerate in an airtight container. 

  2. Meanwhile, remove stems from kale and discard. Tear leaves into pieces. Place kale in a large bowl; drizzle with 1 tablespoon oil. Massage oil into kale leaves until leaves slightly wilt. Add pears, pomegranate, and pecans to kale; toss gently to combine. Remove half of onion from mirin mixture with a slotted spoon; add to salad. (Reserve remaining onion for another use) 

  3. Combine remaining 5 tablespoons oil, 3 tablespoons vinegar, syrup, mustard, salt, pepper, and garlic in a jar; close with lid, and shake until emulsified. Drizzle over salad.

NOTES:

Calories 196; Fat 16g (sat 2g); Protein 3g; Carb 13g; Fiber 3g; Sugars 8g (added sugars 2g); Sodium 168mg
Created using The Recipes Generator

The first step for this salad is to make a batch of pickled onions. I have you make double what you need for the salad—because why not go ahead and use a whole onions?

IMG_0480.jpeg

The leftover pickled onions will hold up well in the fridge for a couple of weeks, and you can use them on tacos, other salads, grain bowls, and more. My easy two-ingredient method relies on two products from the Asian foods aisle: mirin and rice vinegar. These guys:

IMG_0432.jpeg

You can find rice vinegar at any supermarket and mirin at most (I got mine at Target). The mirin is seasoned with salt and sugar plus has a pleasant, light wine flavor—so it takes the place of wine, salt, and sugar. The rice vinegar is softer than many other vinegars, which could make the pickled onions sharp and wince-inducing.

I love lacinato kale for its bumpy texture and earthy and faintly sweet flavor. If you can’t find it, you can use regular curly kale—just know that it’s a little tougher. No matter which you use, do take a minute or two to massage the leaves with a little oil first, to help break down the fibers and tenderize the leaves.

As for the pears, as I mentioned above, I lucked into some gorgeous Seckel pears at the Publix down the road. They come in a bag, like this:

IMG_0436.jpeg

And they’re smaller than most pears. See?

IMG_0438.jpeg

Now for the pomegranates. Look, I know that the arils you can buy in the little cups are very convenient. I’ve used them myself on more than one occasion. But they just don’t taste as good as ones you pull fresh from the whole fruit. I learned a trick that makes that process a little easier. First, cut about 1/4-inch off the top of the fruit, like so:

IMG_0439.jpeg

One you take the “lid” off, you can see where the paper-thin membranes are. It’s a little tricky to see in the photo above, but look for the spoke-like thin white membranes that grow out from the core. You want to score the outer skin of the pomegranate where those membranes run, from the top to the bottom of the fruit, like this:

IMG_0441.jpeg

Once the skin is scored, you can pull apart the fruit. It will break along those “fault lines” like so—

IMG_0442.jpeg

Now you can just gently prod those arils out without having to pick through all the pith and membrane. I swear it’s worth the effort (and there’s not much effort to it).

This salad will fill a big ol’ bowl (meaning it makes a lot). But I predict it will all get happily eaten, with thanksgiving.

Cinnamon-Apple Snack Cake

IMG_0378.jpeg

I’m trying to get ahead for Thanksgiving. My kids are out of school the entire week, and I’ll happily have a houseful of extended family, too. And that, of course, includes my dad, who suffers from celiac disease. I’m always looking for good gluten-free recipes for him—especially desserts, as he has quite a sweet tooth. I wanted a casual cake that I could have on hand for general snacking but that would also be good enough to put out with the holiday feast. And I got there with this recipe. I cannot even express how pleased I am with this cake; it’s one my favorite desserts I’ve ever created, gluten-free or not. My kids agree: They even asked to have it at their birthday party last week! (We ended up opting for something else, but still—they requested it!) Keep reading below the recipe card for some tips and process photos!

Yield: 12 servings

Cinnamon-Apple Snack Cake

prep time: 25 minscook time: 28 minstotal time: 53 mins

I am so happy with how this cake turned out! It comes together in one bowl, and it's moist, tender, and absolutely full of apple flavor. The key is to use Honeycrisp apples, which perfume the whole pan and work some real magic: The batter smells like fresh-pressed cider, and the whole cake tastes as if you somehow crammed the essence of 500 apples into it. My kids went bonkers for it. Connor, in all earnestness, put his hand on my shoulder and said, "Mom. It's really, really good." I can't ask for more than that.

ingredients:

  • 7 oz. (about 2 cups) almond flour
  • 2 3/4 oz. (about 1/2 cup) gluten-free all-purpose flour (I used King Arthur)
  • 2 1/2 tsp. ground cinnamon
  • 2 tsp. baking powder
  • 1/2 tsp. baking soda
  • 1/4 tsp. table salt
  • 1/8 tsp. ground cloves
  • 2 large eggs
  • 1/2 cup low-fat buttermilk
  • 1/3 cup honey
  • 1 1/2 tsp. vanilla extract, divided
  • 1 1/2 cups peeled, shredded Honeycrisp apple (about 1 large [10-12 oz.] apple)
  • 4 oz. 1/3-less-fat cream cheese, softened
  • 6 oz. (about 1 1/2 cups) powdered sugar

instructions:

  1. Preheat oven to 350°F. 
  2. In a medium bowl, combine the flours, cinnamon, baking powder, baking soda, salt, and cloves; stir well to combine. Make a well in center of dry ingredients, and crack eggs into the well. Stir eggs to lightly beat them, then stir in buttermilk, honey, and 1 teaspoon vanilla. Stir mixture well to combine. Fold in shredded apple. Spoon mixture into an 8-inch square metal baking pan coated with cooking spray.
  3. Bake at 350°F for 28 minutes or until a few moist crumbs cling to a wooden pick inserted in center of cake. Cool cake, in pan, on a wire rack.
  4. Place cream cheese and remaining 1/2 teaspoon vanilla in a medium bowl. Beat with a mixer at medium speed until fluffy, about 1 minute. Beating at low speed, gradually add powdered sugar; beat just until combined. Spread frosting over cooled cake.

NOTES:

Calories 261; Fat 12g (sat 2g); Protein 6g; Carb 35g; Fiber 3g; Sugars 27g (added sugars 23g); Sodium 133mg
Created using The Recipes Generator

As I mentioned above, I needed a gluten-free dessert for my dad—and I wanted one that everyone else would love, too. I was unwilling to settle for anything that folks would say was good for a gluten-free cake. That would not be good enough. Thankfully, after a little trial and error, I got there. This cake is just flat-out GOOD. It’s gluten-free, relying on almond flour and gluten-free all-purpose flour (also make sure your baking powder is gluten-free). This is the a-p flour I used:

IMG_0257.jpeg

A little bit of this gluten-free a-p flour lightens the texture of the almond flour, giving the cake a moist, tender texture. (Almond flour alone would produce a dense cake.) Next, the apple variety you use is crucial. And I contend that the only choice is Honeycrisp. It gives a ton of concentrated apple-y flavor, much more than other varieties. I originally tried chopping the apple, but it remained a little too crunchy in the finished cake. So I switched to shredding the apple, and holy cow did that work well! The little apple shreds melt into the batter and distribute the flavor more thoroughly into every bite.

IMG_0272.jpeg

After the cake bakes, make sure to allow it to cool completely. If it’s warm when you top with the icing, you may tear off the tender top layer of the cake as you try to spread, getting crumbs all in the icing. (You may still get a few crumbs in there with a cooled cake, but only a few.)

IMG_0370.jpeg

Use a sharp, thin knife to cut the cake. It’s so tender that it’s a little tricky to cut—not a bad problem if you ask me! And one of the best things about a snack cake is that you can just keep it in the pan and serve straight from there. (Keep leftovers in the fridge since there’s dairy in the frosting.)

IMG_0379.jpeg

Hearty Cabbage and Sausage Soup

IMG_0356.jpg

If you look out on the ol’ interwebs, you’ll find lots of recipes similar to this one (it’s a pretty classic soup). Many include potatoes (mine doesn’t) and lots more sausage than I choose to use. I keep an eye toward sodium and go with only 12 ounces of kielbasa. The Target near my house sells 12-ounce packages of it (I don’t remember the brand), and it’s more than plenty to flavor the whole big pot of soup.

Well, folks, this veggie-loaded soup is just so easy and straightforward that I don’t have any technique or process photos—none needed! All you need is the recipe card. And maybe a side of cornbread. Enjoy!

Yield: 8 (serving size: about 1 3/4 cups)

Hearty Cabbage and Sausage Soup

prep time: 20 minscook time: 41 minstotal time: 61 mins

This humble soup is always on repeat at the Pittman house. I almost thought that it might be too simple to post, but since we love it so much, I figured someone else might love it, too. It's perfect on a chilly night—piping hot and brothy, comforting and full of veggies. It doesn't hurt that the kids love it (and ask for reheated leftovers for school-day breakfasts!) and that the ingredients are pretty inexpensive. It makes almost a gallon, so use a large Dutch oven. The soup holds well for up to three days (and reheats beautifully), but I wouldn't recommend freezing it—the cabbage would get too mushy when the soup thawed. No step-by-step technique photos needed for this recipe: It's just that easy to make!

ingredients:

  • 2 Tbsp. olive oil
  • 2 1/2 cups chopped white onion (about 1 large onion)
  • 1 1/2 cups thinly sliced celery (about 3 large stalks)
  • 4 garlic cloves, minced
  • 4 large carrots, peeled and thinly sliced
  • 12 oz. kielbasa or other smoked sausage, thinly sliced into rounds
  • 1 medium head green cabbage (about 2 1/2 lb.), cored and coarsely chopped
  • 4 cups unsalted chicken stock (such as Swanson)
  • 3-4 cups water
  • 1 Tbsp. fresh or 1 tsp. dried thyme leaves
  • 2 bay leaves
  • 1 (14.5-oz.) can fire-roasted diced tomatoes, undrained
  • 1 tsp. black pepper
  • 1/2 tsp. kosher salt
  • 6 oz. fresh baby spinach

instructions:

  1. Heat oil in a large Dutch oven over medium-high heat. Add onion, celery, and garlic; sauté 5 minutes. Stir in carrots and kielbasa; sauté 4 minutes or until sausage begins to brown.
  2. Pile cabbage into pan. Pour chicken stock and enough water to mostly cover cabbage (3-4 cups) over cabbage. Gently stir in thyme and bay leaves, then stir in tomatoes, pepper, and salt. 
  3. Bring to a boil; reduce heat, cover, and simmer for 40 minutes or until cabbage is tender. Uncover and stir in spinach; cook 1 minute or until spinach wilts.

NOTES:

Calories 253; Fat 15g (sat 4g); Protein 10g; Carb 22g; Fiber 7g; Sugars 10g (added sugars 1g); Sodium 684mg
Created using The Recipes Generator

Slow-Roasted Salmon with Orange-Olive Salsa

IMG_0301.jpg
Yield: 4 (serving size: 1 fillet and 1/4 cup salsa)

Slow-Roasted Salmon with Orange-Olive Salsa

This slow, gentle roasting technique might just become your new favorite way to cook salmon. The low heat (only 250°F) keeps the flesh super-unctuous and oily-rich, and pretty much assures you won’t overcook the fish. The accompanying salsa is the perfect partner, with its bright pop of juicy citrus and meaty bits of buttery Castelvetrano olives (can we all just agree that they’re the best olives?).

prep time: 20 minscook time: 20 minstotal time: 40 mins

ingredients

  • 4 (6-oz.) salmon fillets (I used skin-on, sustainable farmed salmon)
  • Cooking spray
  • 1/2 tsp. kosher salt, divided
  • 1/4 tsp. black pepper
  • 2 Tbsp. extra-virgin olive oil, divided
  • 2 navel oranges

  • 1/2 cup coarsely chopped pitted Castelvetrano olives (about 16 olives)
  • 1/4 cup fresh flat-leaf parsley leaves
  • 2 Tbsp. slivered shallot or red onion
  • 1/4 tsp. crushed red pepper

instructions

  1. Let salmon fillets stand at room temperature for 20 to 30 minutes to take the chill off. Preheat oven to 250°F.

  2. Arrange fillets in an 11 x 7–inch baking dish coated with cooking spray. Sprinkle with 3/8 tsp. salt and black pepper. Drizzle evenly with 1 tablespoon oil.
  3. Grate 1/2 teaspoon zest from one of the oranges; set zest aside. Remove peel and all pith from both oranges; slice between membranes to remove orange sections. Place sections in a medium bowl. Hold orange membranes over salmon in baking dish, and squeeze juice over fillets.
  4. Bake fillets at 250°F for 20 to 25 minutes, to desired degree of doneness. (Mine were to my liking right at 20 minutes.)
  5. Meanwhile, add olives, parsley, shallot, red pepper, orange zest, remaining 1 tablespoon oil, and 1/8 teaspoon salt to orange sections; toss gently to combine. Serve salsa with salmon.

NOTES:

Calories 397; Fat 27g (sat 5g); Protein 27g; Carb 11g; Fiber 2g; Sugars 8g (added sugars 0g); Sodium 538mg
Created using The Recipes Generator
IMG_0297.jpg

OK, so maybe you’re not sold yet on this idea. Let me try to get you there… Have you ever bought some beautiful salmon fillets, anticipating that oily, silky, fatty-in-all-the-good-ways texture, only to overcook the fish (even slightly) so that the texture falls flat? Yeah, that won’t happen with this slow-roasting method. It cooks the fish ever so gently so that it never loses that buttery silkiness you crave.

This recipe is pretty simple—not too much technique to explain. The hardest part is maybe sectioning the orange?? But even that isn’t hard. Just cut away all the peel and pith, and then cut between the membranes to extract the sections. Like this:

IMG_0275.jpg

After you’ve removed all the sections, don’t toss the membranes just yet. Hold on to these guys—

IMG_0276.jpg

And squeeze them over the fillets in the baking dish, like so:

IMG_0283.jpg

Then bake for a short 20ish minutes, and you’ll be delighted by the results. No. More. Overcooked. Salmon. I mean, just look at this texture!

IMG_0303.jpg

Butternut, Caramelized Onion, and Blue Cheese Pizza

Yield: 4 servings (serving size: 2 slices)

Butternut, Caramelized Onion, and Blue Cheese Pizza

This pizza is my love letter to fall. All the best seasonal flavors converge here: sweet butternut squash, woodsy herbs, toasty hazelnuts, and pungent blue cheese. A bed of silky caramelized onions serves as the "sauce," a delicious change of pace. The butternut ribbons are beautiful and—bonus benefit—cook quickly in a super-hot oven (no par-cooking required). Serve with an arugula or kale salad for a dynamite pairing.

prep time: 38 minscook time: 10 minstotal time: 48 mins

ingredients

  • 12 oz. whole-wheat pizza dough (I used dough from Whole Foods)
  • 3 Tbsp. olive oil, divided
  • 4 cups vertically sliced yellow onions (about 1 lb., 2 medium onions)
  • 4 garlic cloves, thinly sliced
  • 2 tsp. fresh thyme leaves
  • 3/8 tsp. kosher salt, divided
  • 8 oz. butternut squash, shaved into ribbons (about 3 cups ribbons; see tips below)
  • 2 oz. firm blue cheese, thinly sliced (I used Point Reyes)
  • 1 Tbsp. fresh sage leaves
  • 2 Tbsp. chopped toasted hazelnuts
  • Freshly ground black pepper

instructions

  1. Let dough stand, covered, at room temperature to take the chill off.
  2. Place a pizza stone or heavy baking sheet in oven. Preheat oven to 500°F (leave pizza stone or baking sheet in oven as it heats).
  3. Heat a large skillet over medium-high heat. Add 2 tablespoons oil; swirl to coat. Add onions; sauté 5 minutes, stirring frequently. Reduce heat to medium-low (I went closer to low than medium), and stir in garlic. Cook 20 minutes or until onions are silky, very tender, and caramelized; stir in a tablespoon of water every now and then if the onions start to stick or burn. Remove from heat, and stir in thyme and 1/4 teaspoon salt.
  4. Meanwhile, combine butternut ribbons, 1 1/2 teaspoons oil, and remaining 1/8 teaspoon salt; toss gently to combine.
  5. Pat or roll dough into a 12-inch circle on a piece of parchment paper. Brush outside rim of dough with about 3/4 teaspoon oil. Top dough evenly with onions, leaving a 1-inch border. Arrange butternut ribbons over onions. 
  6. Lift dough, on parchment, and place parchment and dough on hot pizza stone. Bake pizza at 500°F for 10 minutes or until crust is browned and crisp and butternut is browned in places (broil for a minute or two if the top isn't browned to your liking). Remove pizza from oven; brush outside rim of crust with remaining 3/4 teaspoon oil. Nestle cheese into butternut ribbons (note: residual heat will soften and melt the cheese). Sprinkle pizza with hazelnuts, sage, and pepper.

calories

418

fat (grams)

18

sat. fat (grams)

4

carbs (grams)

46

protein (grams)

10

sugar (grams)

5

Added sugar (in grams)

0

Fiber (in grams)

6

Sodium (in mg)

717

Added sugar (in grams)

0

Fiber (in grams)

6

Sodium (in mg)

717
Created using The Recipes Generator

There you go—recipe card up top, so you don’t have to scroll through lots of photos and words to get to what you want most. This is my first blog post (!!), so please forgive any errors or oddities. I’m learning as I go…

This pizza is nothing short of a knockout. It’s beautiful, delicious, healthy, easier than it looks, and meatless. Just keep in mind that the pizza is your entree, not your entire meal—so serve it with a side salad or some roasted veggies. Here are some helpful tips as you’re making it:

First, make sure you get the pizza dough out of the fridge. Let it stand at room temperature as the oven heats and you do all the prep work. Trust me, this is a crucial step. Room-temp dough is much easier to work with than cold dough. That cold dough will snap back and fight you as you try to roll or stretch it out. But room-temp dough? It’s much more well behaved.

For the onions, I recommend standard yellow onions—not sweet onions, which (with the butternut) would take the pizza in a too-sweet direction. Besides, the standard guys gain a little sweetness through the caramelization process. I call to vertically slice them, which helps them hold their shape better. It basically looks like this:

IMG_0137.jpg

As for caramelizing those onions, I encourage you to exercise patience. Don’t try to rush the process by turning up the heat; you won’t get the silky texture you’re after. Listen as the onions cook; if you hear too much sizzle, they may be sticking or scorching—at which point you should stir in a tablespoon of water. This is what they should look like when they’re ready (this is before I stirred in the thyme and salt):

IMG_0142.jpg

Now for the squash. Do the prep for this as the onions are cooking. Since you’re aiming for long ribbons, choose a squash with a long neck; this will make creating long ribbons much easier. Here’s the one I used:

IMG_0139.jpg

I peeled the entire neck with a vegetable peeler, then cut it off near the bulb. I then cut the neck in half vertically, then into a few one-inch thick slabs. Then I ran the vegetable peeler over the slabs to create ribbons; I found it easiest to start at the farther edge and pull the peeler toward me. You’ll have leftover squash, which is perfect for cubing and roasting for a side dish or to puree for a soup.

IMG_0141.jpg

Once you toss your squash with a little oil and salt, it's time to assemble the pizza. Stretch the dough into a 12-inch circle on a piece of parchment paper. The paper allows you to lift the pizza, on the paper, and place everything (paper and all) on the hot pizza stone. You still get the crispy crust, and the whole process is much easier than trying to slide the dough from a pizza peel onto the hot stone. Once the dough is shaped, top with the onions.

IMG_0145.jpg

Now pile on the squash. It may seem like a lot, but it cooks down a good bit in the oven.

IMG_0147.jpg

Pop that guy in a 500°F oven for 10 or so minutes, then take it out and brush a little oil onto the outer rim of the crust; this adds sheen and flavor. Now top with cheese, sage, hazelnuts, and black pepper. (If you add the cheese before the pizza goes in the oven, it will turn into buttery goo; it’s delicious, but it just melts away to have a visual impact. The residual heath from the hot pizza will soften and slightly melt the cheese anyway.) That’s it! Enjoy!!

IMG_0157.jpg