Sheet Pan Catfish Dinner

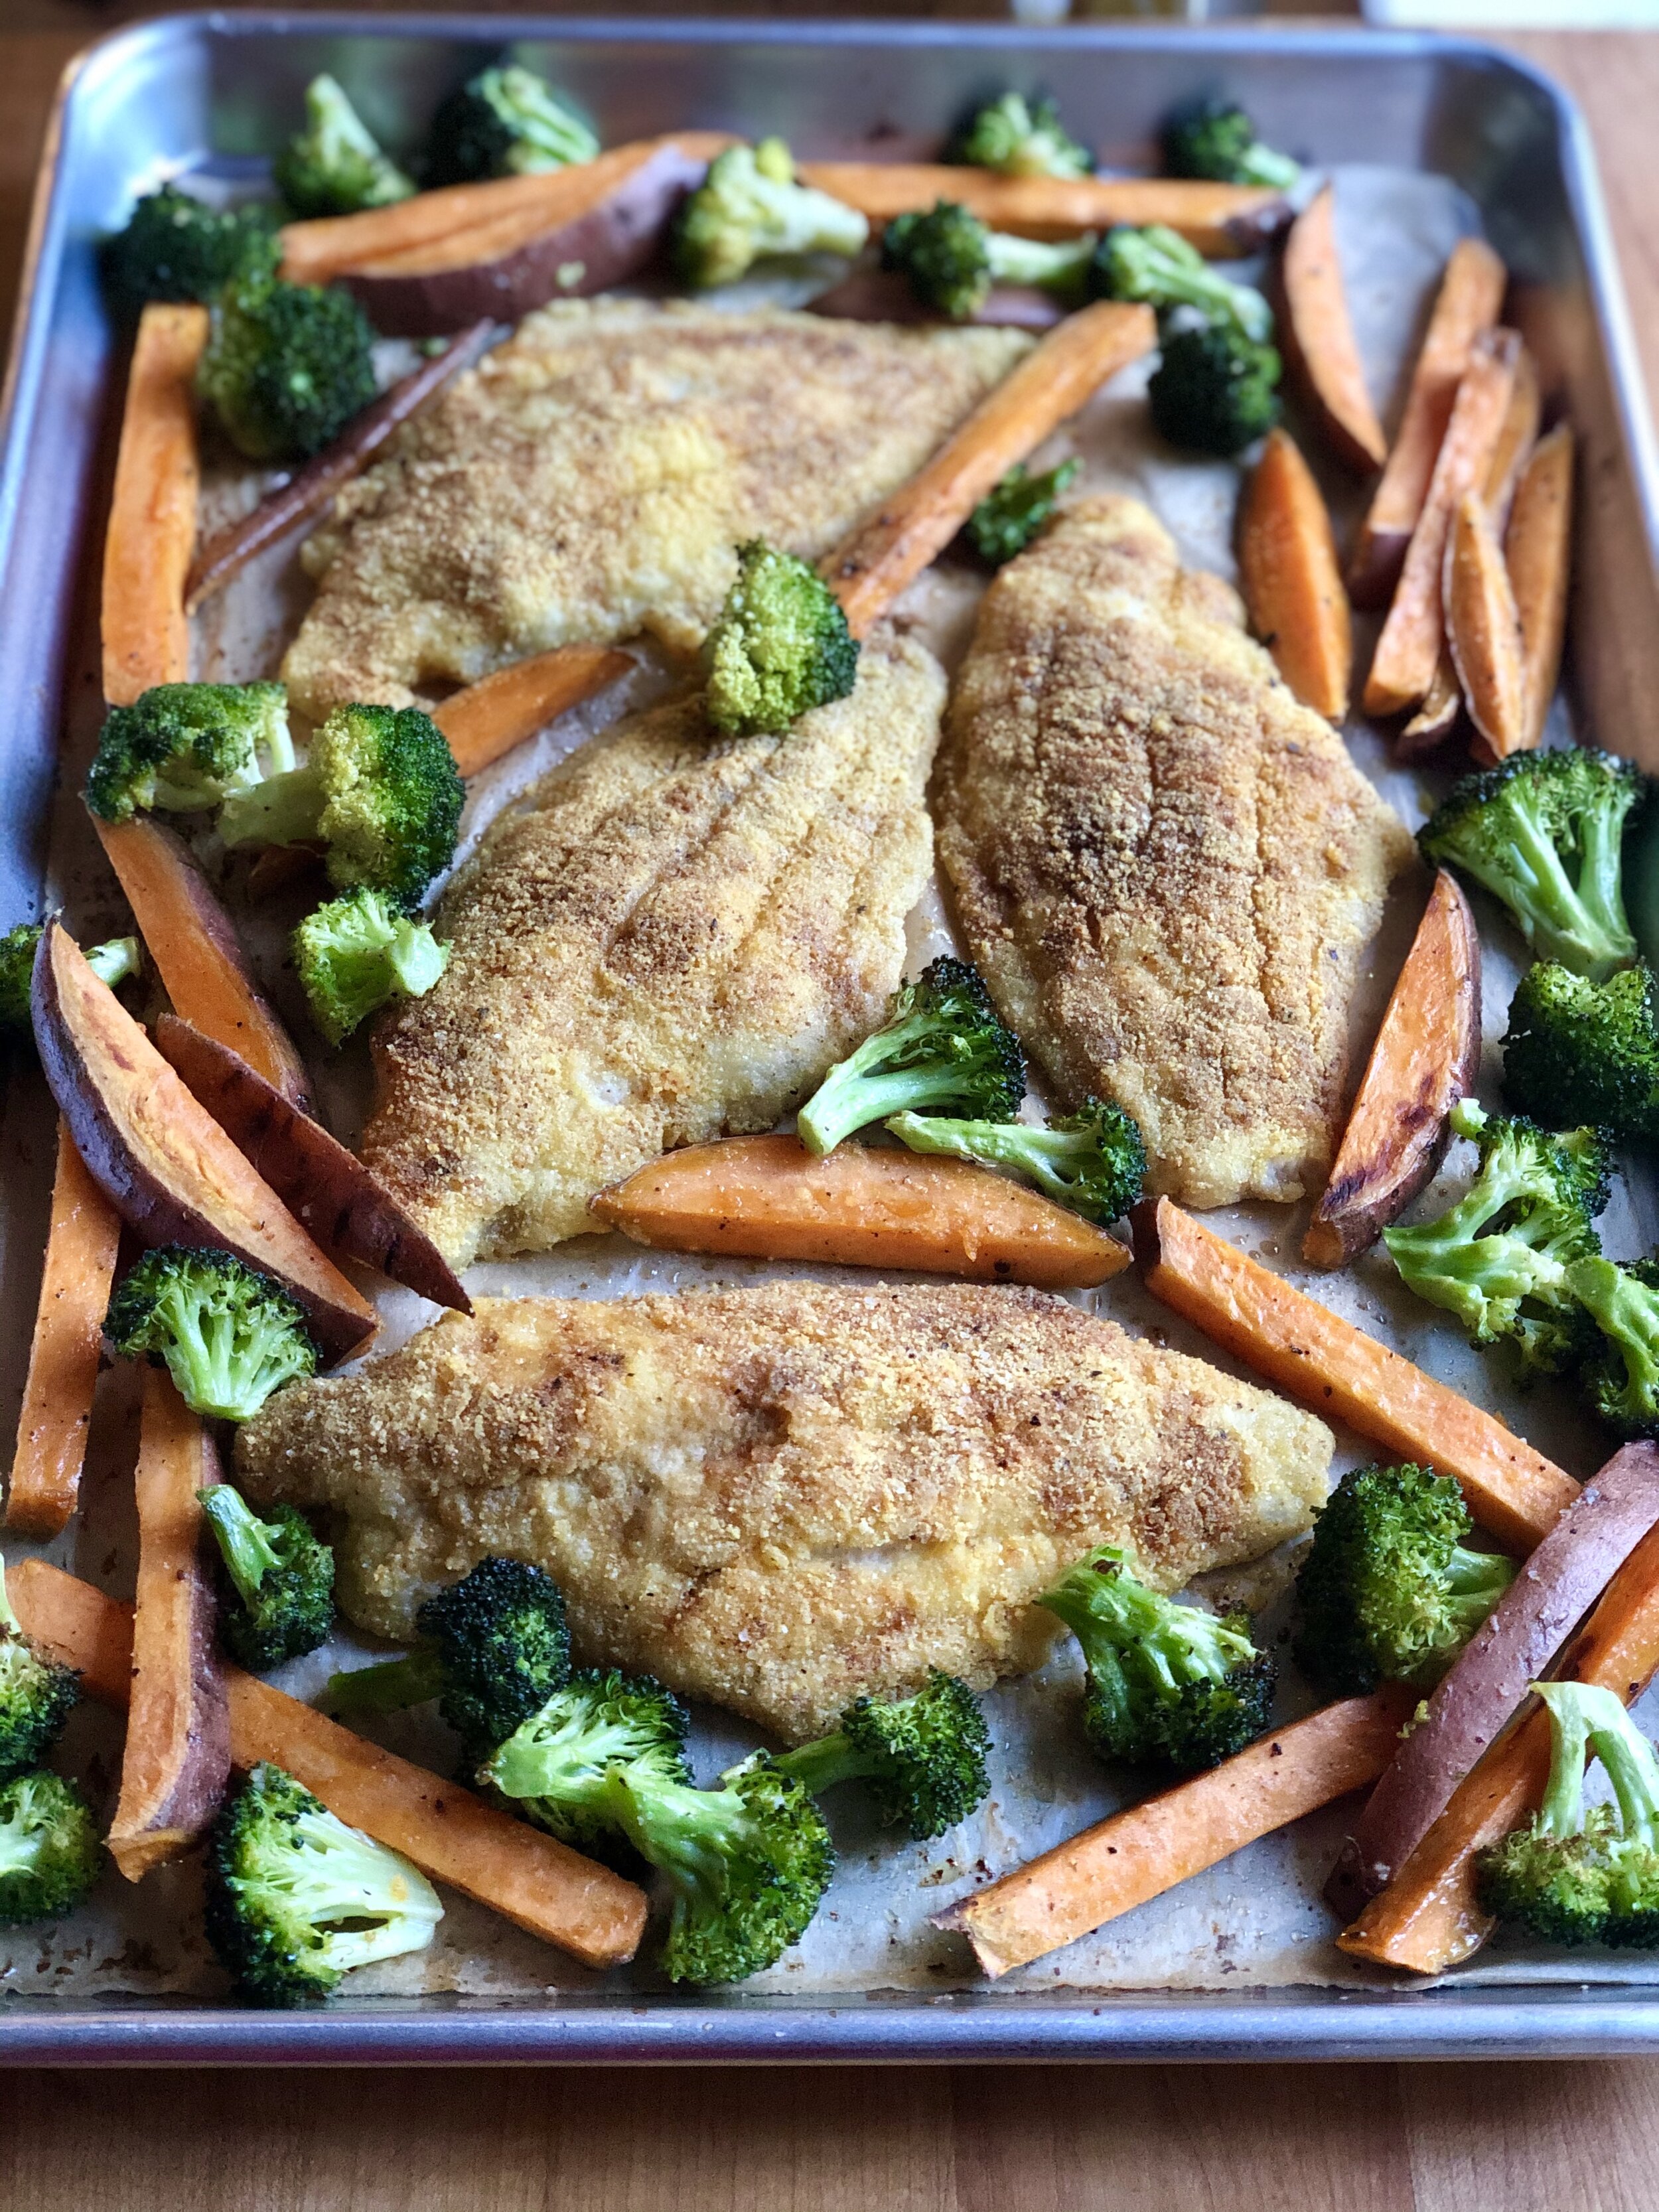
SheetPan_angle.jpeg

*sponsored post

When time is tight and I just don’t feel like stirring and sautéing my way to dinner—and I really don’t feel like washing pots and pans—thank goodness I can rely on a good sheet pan dinner. Everything cooks together on a lined sheet pan (that I don’t have to wash), and I bring that pan out to the table as the “platter” we serve ourselves from. It feels fun and casual, and I feel good knowing that, even with minimal effort, I’ve put a healthy dinner on the table for my family. 

I created this Sheet Pan Catfish Dinner because I knew it would be a surefire hit with my family, boasting our favorite veggies, our most-loved fish, and a lovely assortment of textures. Sweet potato “fries” get a head start on cooking so that they’ll be buttery tender inside, with some caramelized crunchy bits outside. The broccoli goes on later so that it ends up with a crisp-tender texture and some frizzled parts, too. But the real star of this dinner is the oven-fried catfish. It bakes up crispy on the outside, moist and tender on the inside, and perfectly seasoned bite after bite. And, with U.S. Farm-Raised Catfish, I know the flavor will be reliably mild and buttery, and the fish will be sustainably raised. It’s a dinner that makes me feel good for so many reasons.

Yield: 4 servings (serving size: 1 catfish fillet and about 1 cup vegetables)
Author:

Sheet Pan Catfish Dinner

prep time: 10 Mcook time: 25 Mtotal time: 35 M
They key to this dinner is to add the food in stages—the sweet potatoes take the longest to cook, so they go into the oven first. Then, after a few minutes, you add the breaded catfish and broccoli florets. At the end, you get tender potatoes, moist fish, and crisp-frizzled broccoli. I like to brush a little olive oil onto the fish to help the breading stick, and then sprinkle my spice blend directly onto the fish—instead of putting in the breading. That way, I know that all of it goes where I want it (on the fish) and doesn’t get tossed out with excess breading.

ingredients:

  • 1 large sweet potato (about 14 ounces), unpeeled and cut into 1/3-inch-thick “fries”
  • 3 Tbsp. olive oil, divided
  • 1 tsp. kosher salt, divided
  • 3/4 tsp. black pepper, divided
  • 4 cups small broccoli florets
  • 3/4 tsp. garlic powder
  • 1/2 tsp. paprika
  • 1/4 tsp. cayenne pepper
  • 4 (6-ounce) catfish fillets
  • 2/3 cup yellow cornmeal
  • Cooking spray

instructions:

How to cook Sheet Pan Catfish Dinner

  1. Preheat oven to 425°F. Line a large rimmed baking sheet with parchment paper.
  2.  Combine sweet potato, 1 tablespoon oil, 1/4 teaspoon salt, and 1/4 teaspoon black pepper in a large bowl, tossing well to coat. Arrange in a single layer on prepared baking sheet. Bake at 425°F for 10 minutes.
  3. Meanwhile, combine broccoli, 1 tablespoon oil, 1/4 teaspoon salt, and 1/4 teaspoon black pepper in bowl, tossing well to coat.
  4. Combine remaining 1/2 teaspoon salt, 1/4 teaspoon black pepper, garlic powder, paprika, and cayenne pepper in a small bowl. Brush catfish fillets with remaining 1 tablespoon oil, and sprinkle evenly with spice mixture. Place cornmeal in a pie plate or shallow bowl; dredge catfish in cornmeal and shake off excess.
  5. Remove baking sheet from oven; turn sweet potato pieces over and push to outer edges of pan. Arrange catfish across middle of pan and coat tops with cooking spray. Scatter broccoli over sweet potato pieces. Bake at 425°F until fish and sweet potatoes are tender and broccoli is crisp-tender, about 15 minutes.

NOTES:

Calories 458; Fat 20g (sat 4g); Protein 29g; Carb 34g; Fiber 4g; Sugars 5g (added sugars 0g); Sodium 421mg
Created using The Recipes Generator

Grilled Catfish with Warm Street Corn Salad

Blog_Catfish_angle_shallowbowl_withlimes.jpeg

*sponsored post*

I grew up eating catfish—have always loved it for its sweet, mild flavor and buttery texture. And so I’m thrilled to be working in partnership with The Catfish Institute to promote U.S. Farm-Raised Catfish. Besides the fact that it’s always a guaranteed hit with my kids, I love U.S. Farm-Raised Catfish because it’s a sustainable choice I can feel good about: It gets a best choice/green designation from Monterey Bay Aquarium’s Seafood Watch program. 

In the following recipe that I created for this partnership, I grill spice-rubbed catfish fillets to give them a robust, slightly smoky flavor. And I pair these moist fillets with a warm, grilled corn salad based on my love of elote (Mexican street corn). It’s a friendly combo of buttery-rich fish and crunchy-sweet corn that’s brought together under a bright, herby sauce that’s basically a simplified version of chimichurri. This is family-friendly cooking that’s just special enough for company, too.

Yield: 4 servings (serving size: 1 catfish fillet, about 1 1/4 cups salad, and 2 Tbsp. sauce)
Author:

Grilled Catfish with Warm Street Corn Salad

prep time: 20 Mcook time: 16 Mtotal time: 36 M
I love this dish! Grilled corn gets tossed with a little mayo (but not too much), lime juice, chili powder, scallions, and cotija cheese for my off-the-cob take on street corn. This warm, savory salad is then topped with a spice-rubbed grilled catfish fillet and a dollop of simplified chimichurri sauce. The textures are wonderful: tender fish, crunchy corn, and unctuous sauce. And the flavors? Oh my! Sweet corn, salty cheese, bright and herby sauce, and rich fish combine in beautiful harmony.

ingredients:

  • 1 medium garlic clove, peeled
  • 1 1/2 cups coarsely chopped cilantro stems and leaves
  • 6 Tbsp. canola oil, divided
  • 1/4 tsp. crushed red pepper flakes
  • 1 1/2 tsp. kosher salt, divided
  • 1 1/2 tsp. grated lime zest, divided
  • 3 Tbsp. fresh lime juice, divided
  • 4 large ears shucked corn
  • 1 tsp. ground cumin
  • 1 tsp. garlic powder
  • 1/2 tsp. black pepper
  • 4 U.S. Farm-Raised Catfish Fillets
  • 1/4 cup mayonnaise
  • 1 tsp. chili powder
  • 1/2 cup thinly sliced green onions
  • 4 oz. cotija cheese, crumbled (can substitute feta or queso fresco)
  • Lime wedges (optional)

instructions:

How to cook Grilled Catfish with Warm Street Corn Salad

  1. Preheat grill to medium-high heat.
  2. While grill heats, place garlic clove in a mini food processor; process until finely chopped. Add cilantro; process until finely chopped. With processor running, gradually add 1/4 cup oil until well blended. Add red pepper, 1/4 teaspoon salt, 1/2 teaspoon lime zest, and 1 tablespoon lime juice; pulse until combined. Set aside.
  3. Brush corn with 1 tablespoon oil. Place corn on grill rack; grill until lightly charred on all sides, turning occasionally, about 8 minutes. Remove from grill and cool slightly.
  4. Combine 3/4 teaspoon salt, cumin, garlic powder, and black pepper. Brush catfish fillets with remaining 1 tablespoon oil. Sprinkle evenly on both sides with spice mixture. Arrange catfish on oiled grill rack; grill until fish flakes easily when tested with a fork, about 3-4 minutes per side. Remove from grill and keep warm.
  5. Cut corn kernels off the cobs and place in a large bowl. Combine corn, mayonnaise, chili powder, remaining 1 teaspoon lime zest and 2 tablespoons lime juice, and remaining 1/2 teaspoon salt. Stir in green onions and cheese. Serve corn salad with catfish and sauce. Serve with lime wedges, if desired.
Created using The Recipes Generator


Simple Smoky Romano Beans

P1110264.jpg

This dish is so easy to make that it almost doesn't even warrant a written recipe. That said, it's nice to have a reference for how to prep ingredients like these Romano beans, a less-common variety of snap beans. If you can't find fresh Romano beans, you can sub in green beans; shorten the blanching time by a couple of minutes so they don't get overcooked. See notes below for Romano bean prep.

Yield: 4 (serving size: about 1 cup)
Author:

Simple Smoky Romano Beans

prep time: 5 Mcook time: 13 Mtotal time: 18 M
Oh yeah—this is the type of easy veggie dish I want (no, demand!) on repeat all summer long. It goes with anything and darn near steals the show despite its simplicity. It's quick to make, holds up well as leftovers, and seems to one-up regular green beans because of the meatier texture of Romano beans. (Of course, regular green beans will work beautifully here if you can't find Romano beans.) One simple spice addition gives it that type of can't-put-your-finger-on-it flavor oomph that makes a dish truly memorable.

ingredients:

  • 1 1/4 lb. fresh Romano beans (see notes below)
  • 1 1/2 slices thick-cut bacon (I know, it's an odd amount. But 2 slices were too many, and 1 slice wasn't enough.)
  • 1/4 to 3/8 tsp. ground coriander
  • 1/4 tsp. kosher salt
  • 1/4 tsp. freshly ground black pepper

instructions:

How to cook Simple Smoky Romano Beans

  1. Snap off stem ends of beans, pulling and discarding any strings. Snap beans in half or into thirds, and leave smaller beans whole. 
  2. Bring a large Dutch oven full of water to a boil. Add beans; boil until crisp-tender, 5 to 7 minutes. Drain and plunge beans into ice water to stop the cooking (or rinse under cold tap water). Drain well.
  3. Heat a large skillet over medium-high heat. Cut bacon crosswise into 1/2-inch strips. Add bacon to pan; cook until crisp, stirring occasionally, about 4 minutes. Remove bacon from pan with a slotted spoon, reserving drippings in pan. Add coriander to drippings; cook 15 seconds, stirring constantly. Add beans to pan; cook until thoroughly heated and lightly seared in spots, tossing frequently, about 4 minutes. Stir in salt and pepper. Sprinkle with bacon.

NOTES:

Calories 114; Fat 4g (sat 2g); Protein 3g; Carb 14g; Fiber 4g; Sugars 2g (added sugars 1g); Sodium 232mg
Created using The Recipes Generator
P1110252.jpg

Shopping for and Preparing Romano Beans

When I was a kid, every grocery store in Mississippi carried Romano beans—except they were labeled, and we called them, pole beans. These broad, flat snap beans are in the same family as green beans and have a similar flavor, though a little bit sweeter, and a meatier, firmer texture. Nowadays, I don’t see them in regular grocery stores but do find them at farmers’ markets and farm stands. I have to say, they are absolutely worth seeking out for that great flavor and irresistible texture.

We’re all pretty used to stringless string beans, so prepping these guys will provide a little nostalgia for those of you who remember pulling strings. (I did find some Romano beans at the farmers’ market a couple of weeks ago that were stringless, but most of the ones I’ve found this summer have strings.) Hold a pod, snap off the stem end, and pull down to remove the string. There might be strings on both sides of the bean, so snapping the bean in half or thirds will give you another shot or two at removing all strings. Once they’re prepped, you’ll want to blanch them for a few minutes in boiling water before finishing in the skillet for this recipe.

They’re also amazing grilled, so give that a try. Prep as explained above (including blanching), drain, and toss with oil before placing over hot coals for a minute or two on each side.

Cucumber, Cantaloupe, and Seared Halloumi Salad

IMG_3170.jpg

This here salad is my JAM. I’ve been getting the most amazing cantaloupes all summer (B’ham folks, I get them at Murphree’s Market)—better than they’ve been any other year I can remember. They are incredibly juicy, honey-floral sweet, and almost indecently fragrant. They are, with no exaggeration, swoon-inducing. And when paired with crisp cucumbers, pungent herbs, and warm halloumi cheese, they are the meal of dreams. Seriously, this salad with a glass of crisp white wine? My summer dream dinner!

Yield: 4 servings (serving size: about 1 1/2 cups)
Author:

Cucumber, Cantaloupe, and Seared Halloumi Salad

prep time: 10 Mcook time: 3 Mtotal time: 13 M
This simple salad celebrates the best of summer, when melons are at their juiciest, sweetest, most fragrant peak, herbs grow to thrilling heights in backyard gardens, and cucumbers offer extreme crunch with each bite. This pairs well with grilled fish or chicken, or stands up on its own for a light dinner—my favorite way to enjoy it. Well, with a very cold glass of white wine on the side, of course.

ingredients:

  • 1 1/2 Tbsp. extra-virgin olive oil, divided
  • 1 1/2 tsp. white balsamic vinegar
  • 1/4 tsp. kosher salt
  • 1/4 tsp. freshly ground black pepper
  • 6 thin cantaloupe wedges, halved crosswise
  • 2 Persian cucumbers (the mini cukes), shaved lengthwise into ribbons with a vegetable peeler
  • 4 oz. halloumi cheese, cut into 1/4-inch-thick slices
  • 2 Tbsp. small fresh mint leaves
  • 2 Tbsp. small fresh basil leaves (or larger leaves, torn)

instructions:

How to cook Cucumber, Cantaloupe, and Seared Halloumi Salad

  1. Combine 1 tablespoon oil, vinegar, salt, and pepper in a large bowl, stirring with a whisk. Add cantaloupe and cucumbers; toss gently to coat. Let stand 5 minutes.
  2. Heat a large nonstick skillet over medium-high heat. Add remaining 1 1/2 teaspoons oil; swirl to coat. Add cheese to pan; cook until nicely browned, 1 1/2 to 2 minutes per side.
  3. Arrange cantaloupe mixture on a platter; drizzle any juices from the bowl over cantaloupe and cucumbers. Arrange warm halloumi on platter. Sprinkle with mint and basil. 

NOTES:

Calories 199; Fat 13g (sat 6g); Protein 7g; Carb 15g; Fiber 2g; Sugars 12g (added sugars 0g); Sodium 392mg
Created using The Recipes Generator

Lady Pea and Tomato Salad

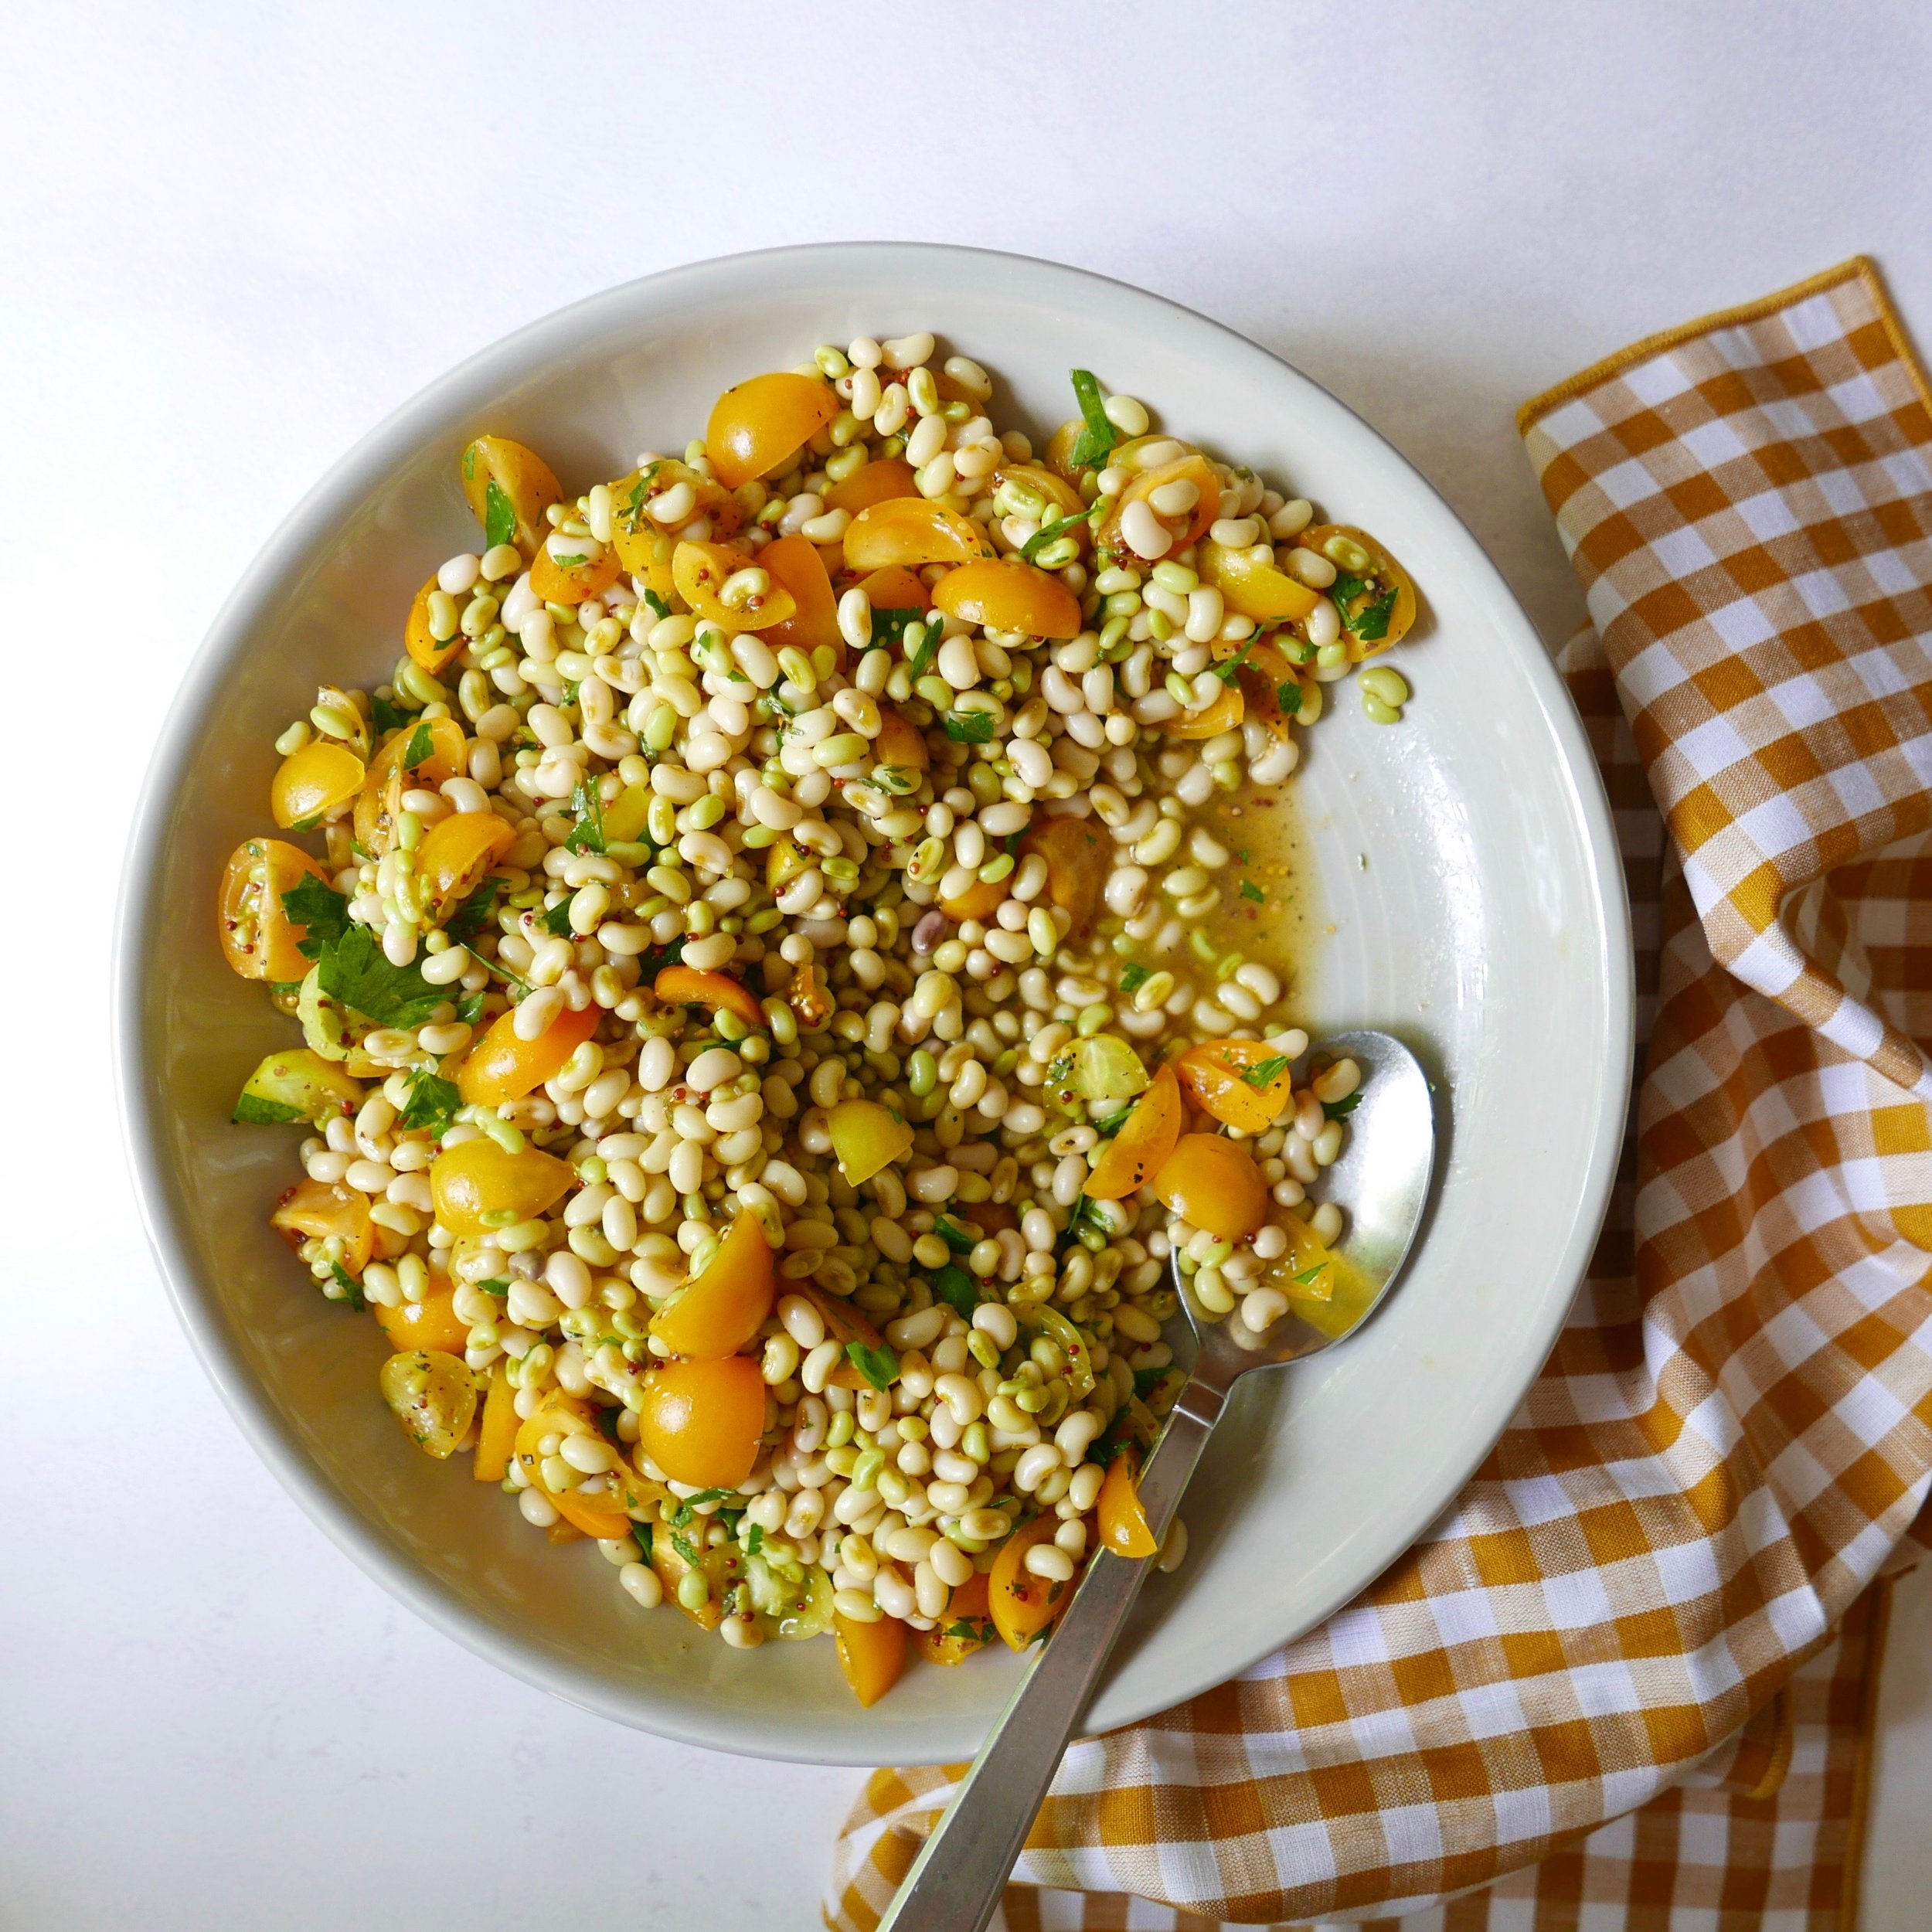
P1110285.jpeg

One of my favorite things about summer is that fresh Southern field peas are easy to find, at least around Birmingham and other places in the South. One particular type of field pea—lady peas—are probably my all-time favorite summer ingredient, and I love to cook up a pot to serve warm as a side—or turn them into a lovely salad as I’ve done here. It’s a versatile side, full of fresh summer flavor. It goes on repeat around here all throughout the season. Be sure to scroll below for more info on lady peas.

Yield: 6 (serving size: about 1 scant cup)
Author: Ann Taylor Pittman

Lady Pea and Tomato Salad

prep time: 15 Mcook time: 20 Mtotal time: 35 M
This is one of my all-time favorite summer sides. Why? Because it goes with anything (burgers, steaks, grilled fish, seared scallops), because I can make it ahead and serve it at room temperature, and because it just tastes so good--clean, simple, wonderful flavors. See below for more info on lady peas. If you can't find them, you can sub fresh lima beans.

ingredients:

  • 1 lb. fresh shelled lady peas (see note below)
  • 4 cups water
  • 2 bay leaves
  • 3 thyme sprigs
  • 2 cups quartered cherry tomatoes (I used yellow ones)
  • 3/4 tsp. kosher salt, divided
  • 1/2 tsp. freshly ground black pepper, divided
  • 2 Tbsp. extra-virgin olive oil
  • 1 Tbsp. red wine vinegar
  • 1 Tbsp. whole-grain Dijon mustard
  • 2 tsp. chopped fresh thyme

instructions:

How to cook Lady Pea and Tomato Salad

  1. Combine peas, water, bay leaves, and thyme sprigs in a large saucepan. Bring to a boil over high heat. Reduce heat, and simmer until peas reach desired degree of tenderness, 20 to 30 minutes. Drain peas and rinse with cold water. Discard bay leaves and thyme sprigs.
  2. Meanwhile, combine tomatoes, 1/2 teaspoon salt, and 1/4 teaspoon pepper; let stand 20 minutes while peas cook.
  3. Combine remaining 1/4 teaspoon salt, remaining 1/4 teaspoon pepper, oil, vinegar, mustard, and chopped thyme in a small jar; shake well until emulsified. 
  4. Combine peas, tomatoes and all their juices, and dressing in a large bowl; toss well to combine. Serve chilled or at room temperature. 

NOTES:

Calories 126; Fat 5g (sat1 g); Protein5 g; Carb 15g; Fiber 5g; Sugars 4g (added sugars 0g); Sodium 156mg
Created using The Recipes Generator

About Lady Peas

Lady peas are a type of Southern field pea with a clean flavor and less-starchy texture than other varieties, such as crowder peas or pink-eye peas/purple hull peas. They have a delicate flavor and wonderful creamy texture that is just something special. If I’m cooking up a pot to enjoy as a warm side dish, I’ll first sauté onions, then add the peas, bay leaves, thyme sprigs, and chicken stock to cover. Once the peas reach the level of tenderness I like, I’ll take them off the stove and just let them sit for a bit. I find that this step (letting them rest) produces amazing results—the creamiest texture throughout. For this salad, though, I like to keep the texture a teensy bit firmer, so I skip that step. Here’s what shelled lady peas look like:

P1110278.jpeg

Aren’t they pretty? Well, I think they are. I can usually find them easily from June till late July at farmers markets and farm stands. Here’s a little more about lady peas from the good folks at Southern Living, if you care to learn more about them. If I can ever find them still in their pods (surprisingly hard to find), I snatch them up—because shelling peas is one of my favorite things to do.

You can turn this salad into a main by adding some protein—some grilled chicken or shrimp, sliced steak, or my favorite, seared scallops:

P1110308.jpeg

Marinated Zucchini Slaw

P1110260.jpeg

Have a glut of zucchini? Or just love it? Or on the lookout for a killer make-ahead side dish that everyone will want the recipe for? Look no further—Marinated Zucchini Slaw is here!

Yield: 4 (serving size: about 1 cup)
Author: Ann Taylor Pittman

Marinated Zucchini Slaw

prep time: 37 Mcook time: total time: 37 M
In the summer, when zucchini is sweetest and most abundant, I'm always looking for new ways to use it. That's how this make-ahead slaw came into being. The flavor profile leans Greek-ish, with oregano, lemon juice, olive oil, and feta, and the texture is just fantastic—crunchy, but more chewy-crunchy than crunchy-crunchy. Important first step: I salt the zucchini to draw out a lot of its moisture. That way, you won't end up with watery slaw, no matter how far ahead you make it. Trust me: I made a double batch and ate the leftovers for three days. Check out my delicious leftover makeover idea below!

ingredients:

  • 4 cups matchstick-cut zucchini (from about 1 1/2 lb. zucchini)--see notes below
  • 1 tsp. kosher salt
  • 1 cup matchstick-cut carrots
  • 1/2 cup chopped green onions
  • 1 Tbsp. finely chopped fresh oregano
  • 2 Tbsp. extra-virgin olive oil
  • 2 Tbsp. fresh lemon juice
  • 1/2 tsp. freshly ground black pepper
  • 2 oz. feta cheese, crumbled

instructions:

How to cook Marinated Zucchini Slaw

  1. Combine zucchini and salt in a large strainer or colander; toss well to coat. (Don't worry about the amount of salt—much of it drains off with the water.) Strain over the sink or over a bowl for 30 minutes.
  2. Combine carrots, green onions, oregano, oil, lemon juice, and pepper in a large bowl; toss well to combine.
  3. Pat zucchini dry on a double layer of paper towels. Add zucchini to carrot mixture; toss well to combine. Add feta; toss gently to combine.

NOTES:

Calories 124; Fat 9g (sat 3g); Protein 4g; Carb 8g; Fiber2 g; Sugars 5g (added sugars 0g); Sodium 280mg
Created using The Recipes Generator

Matchstick-Cut Zucchini

You can certainly make matchstick-cut zucchini by hand—cutting into very thin planks, then into little matchsticks. Or you can use a mandoline, if you have one. But I love using my julienne peeler for the job. I keep the stem end on the zucchini and use it as a handle, then drag the peeler down the length of the squash. I make a few strokes, until I reach the seedy middle, then rotate the zucchini and start on another side. I find that the seedy middle part doesn’t hold up well for this type of recipe. Don’t throw this core away, though. You can shred it and add to pancake or muffin batter, meatloaf, or burger patties for extra moisture. Or you can chop it up, sauté it, and use it in fried rice, soup, omelets—you name it..

IMG_3067.jpeg

Once I have a pile of long shreds, I cut them in half so the slaw is easier to eat. You could also try this recipe with zoodles (I’d cut them so they’re not so long), or with shredded zucchini.

IMG_3069.jpeg

And I know that you can buy matchstick carrots, but since you already have that julienne peeler out, why not go ahead and cut your own fresh ones? You can nibble on the cores when you’re done.

IMG_3071.jpeg

Straining the Zucchini

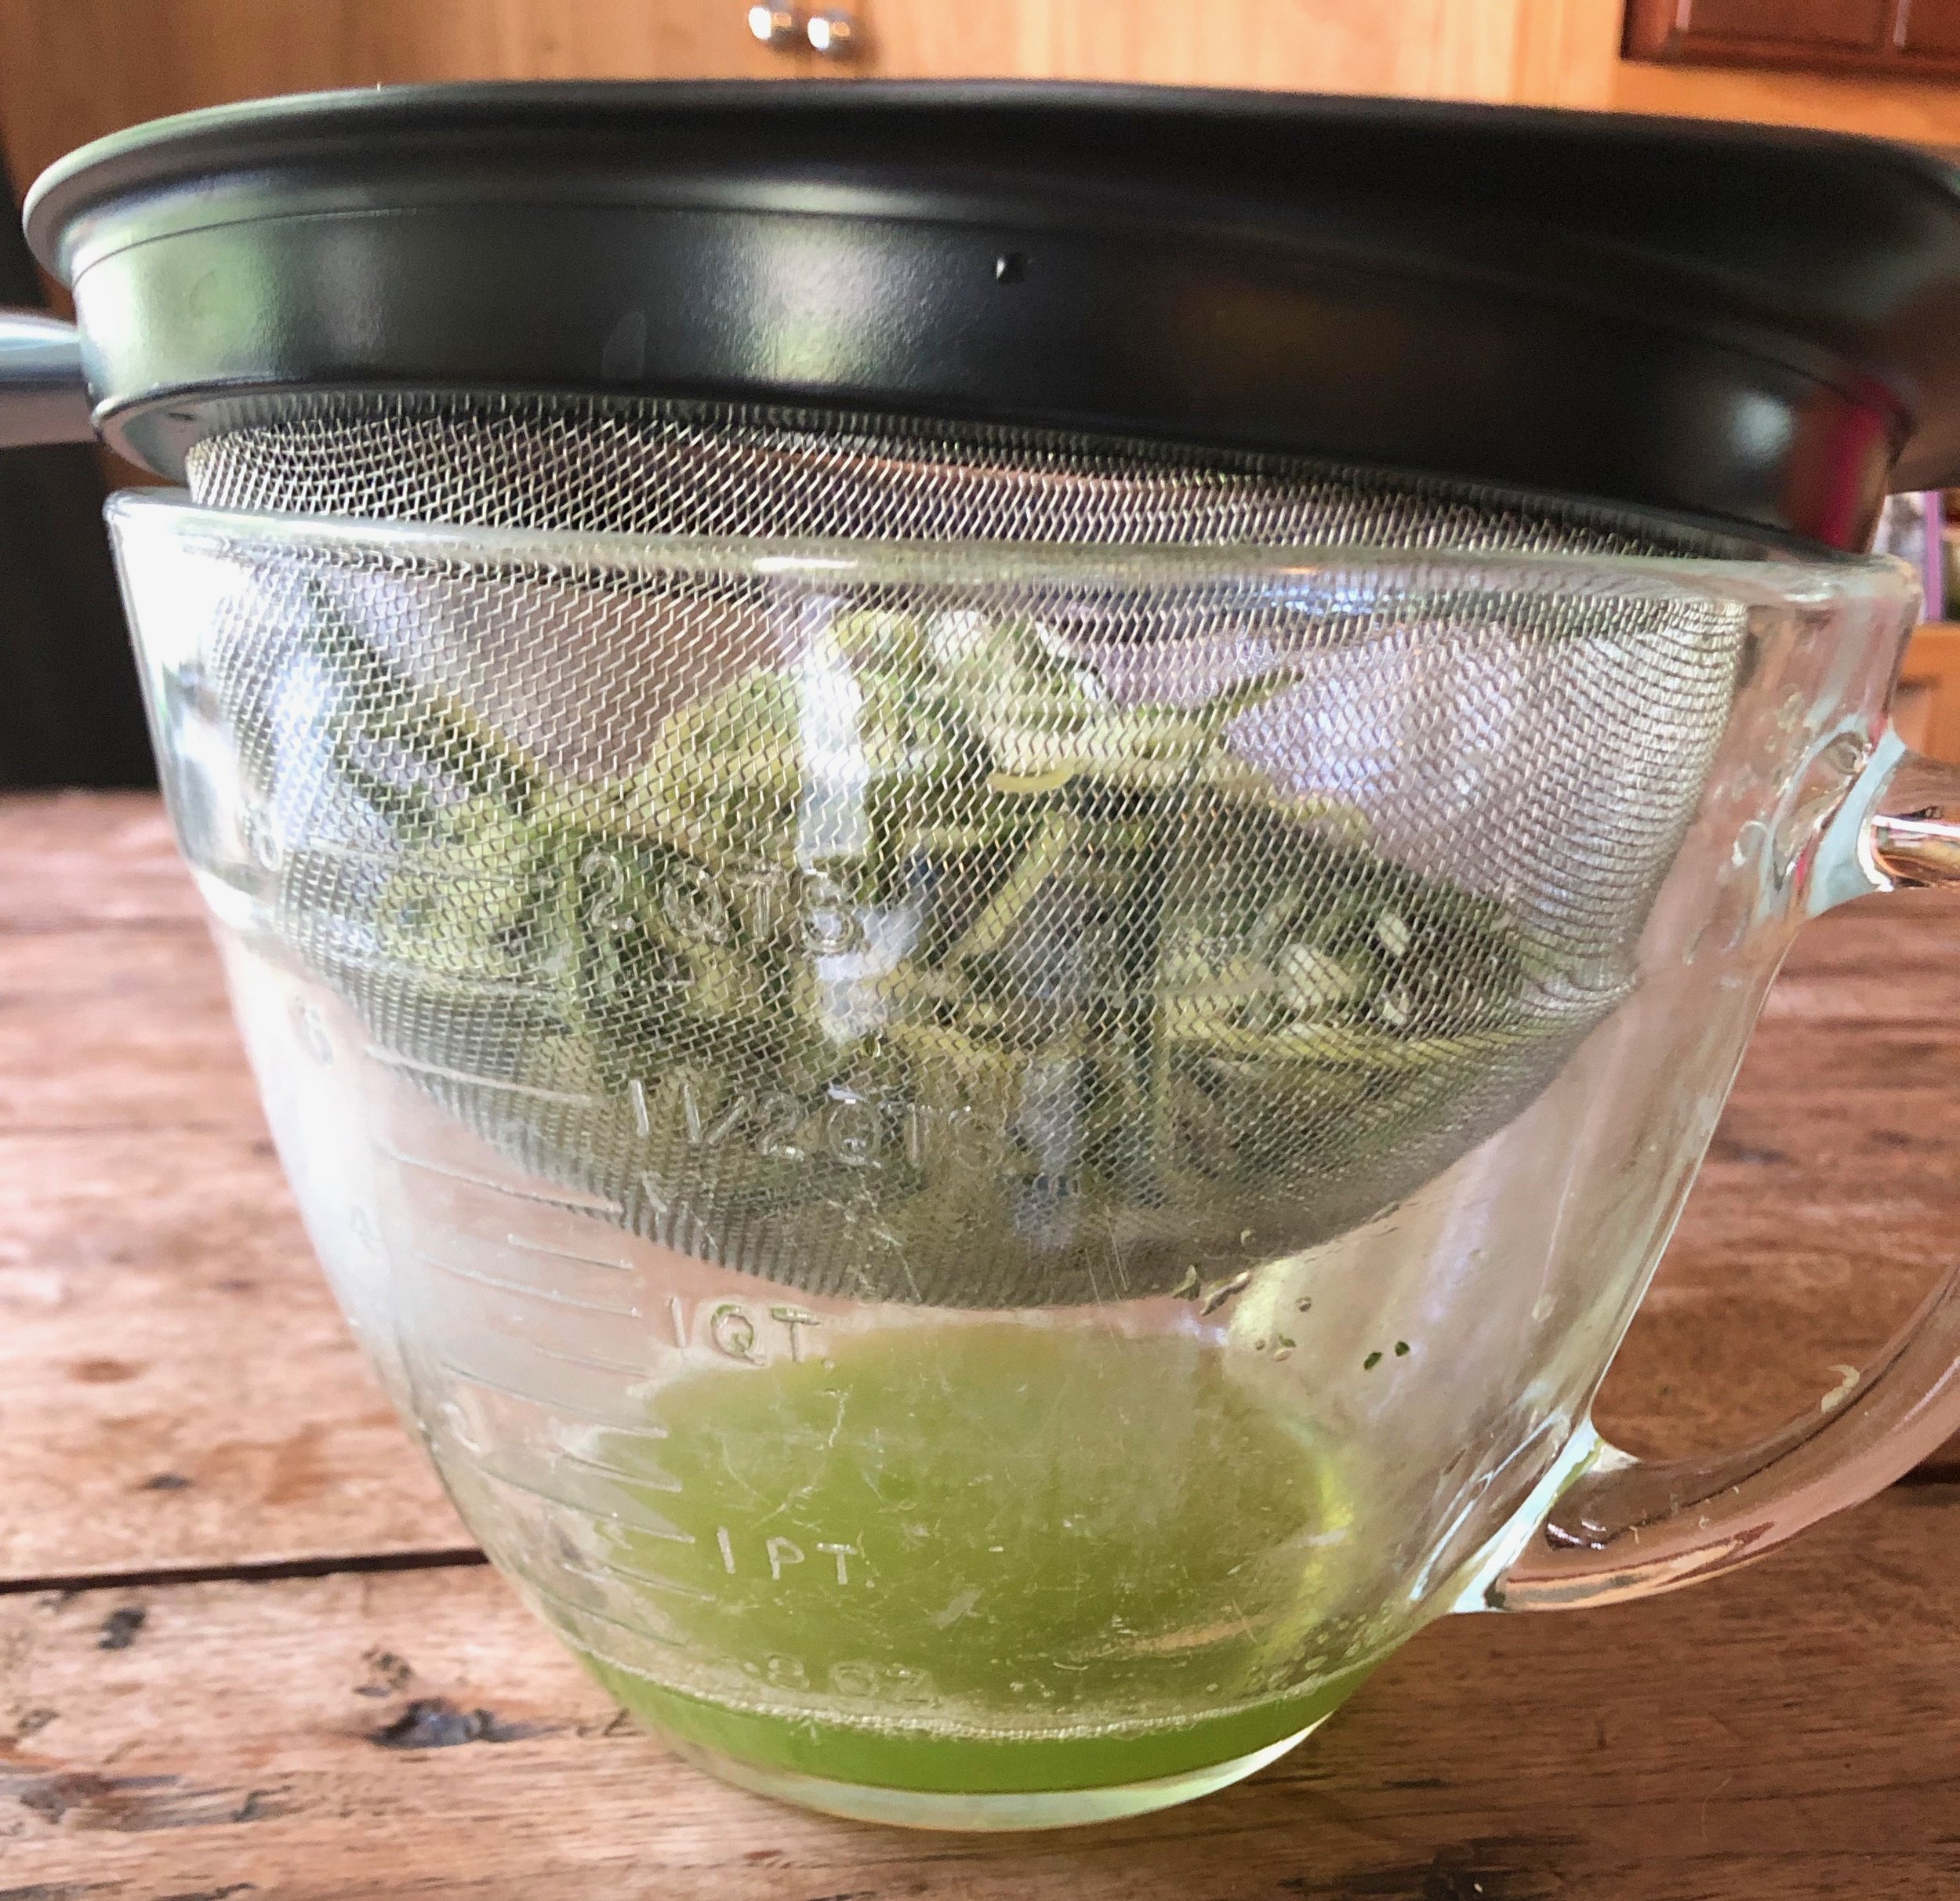
This step is super important. If you skip it, I promise you’ll regret it! You’ll end up with a pool of liquid at the bottom of the bowl (ever had that happen with zoodles?). Look at all the liquid that drains off!

IMG_3075.jpeg

My Favorite Way to Use the Leftovers

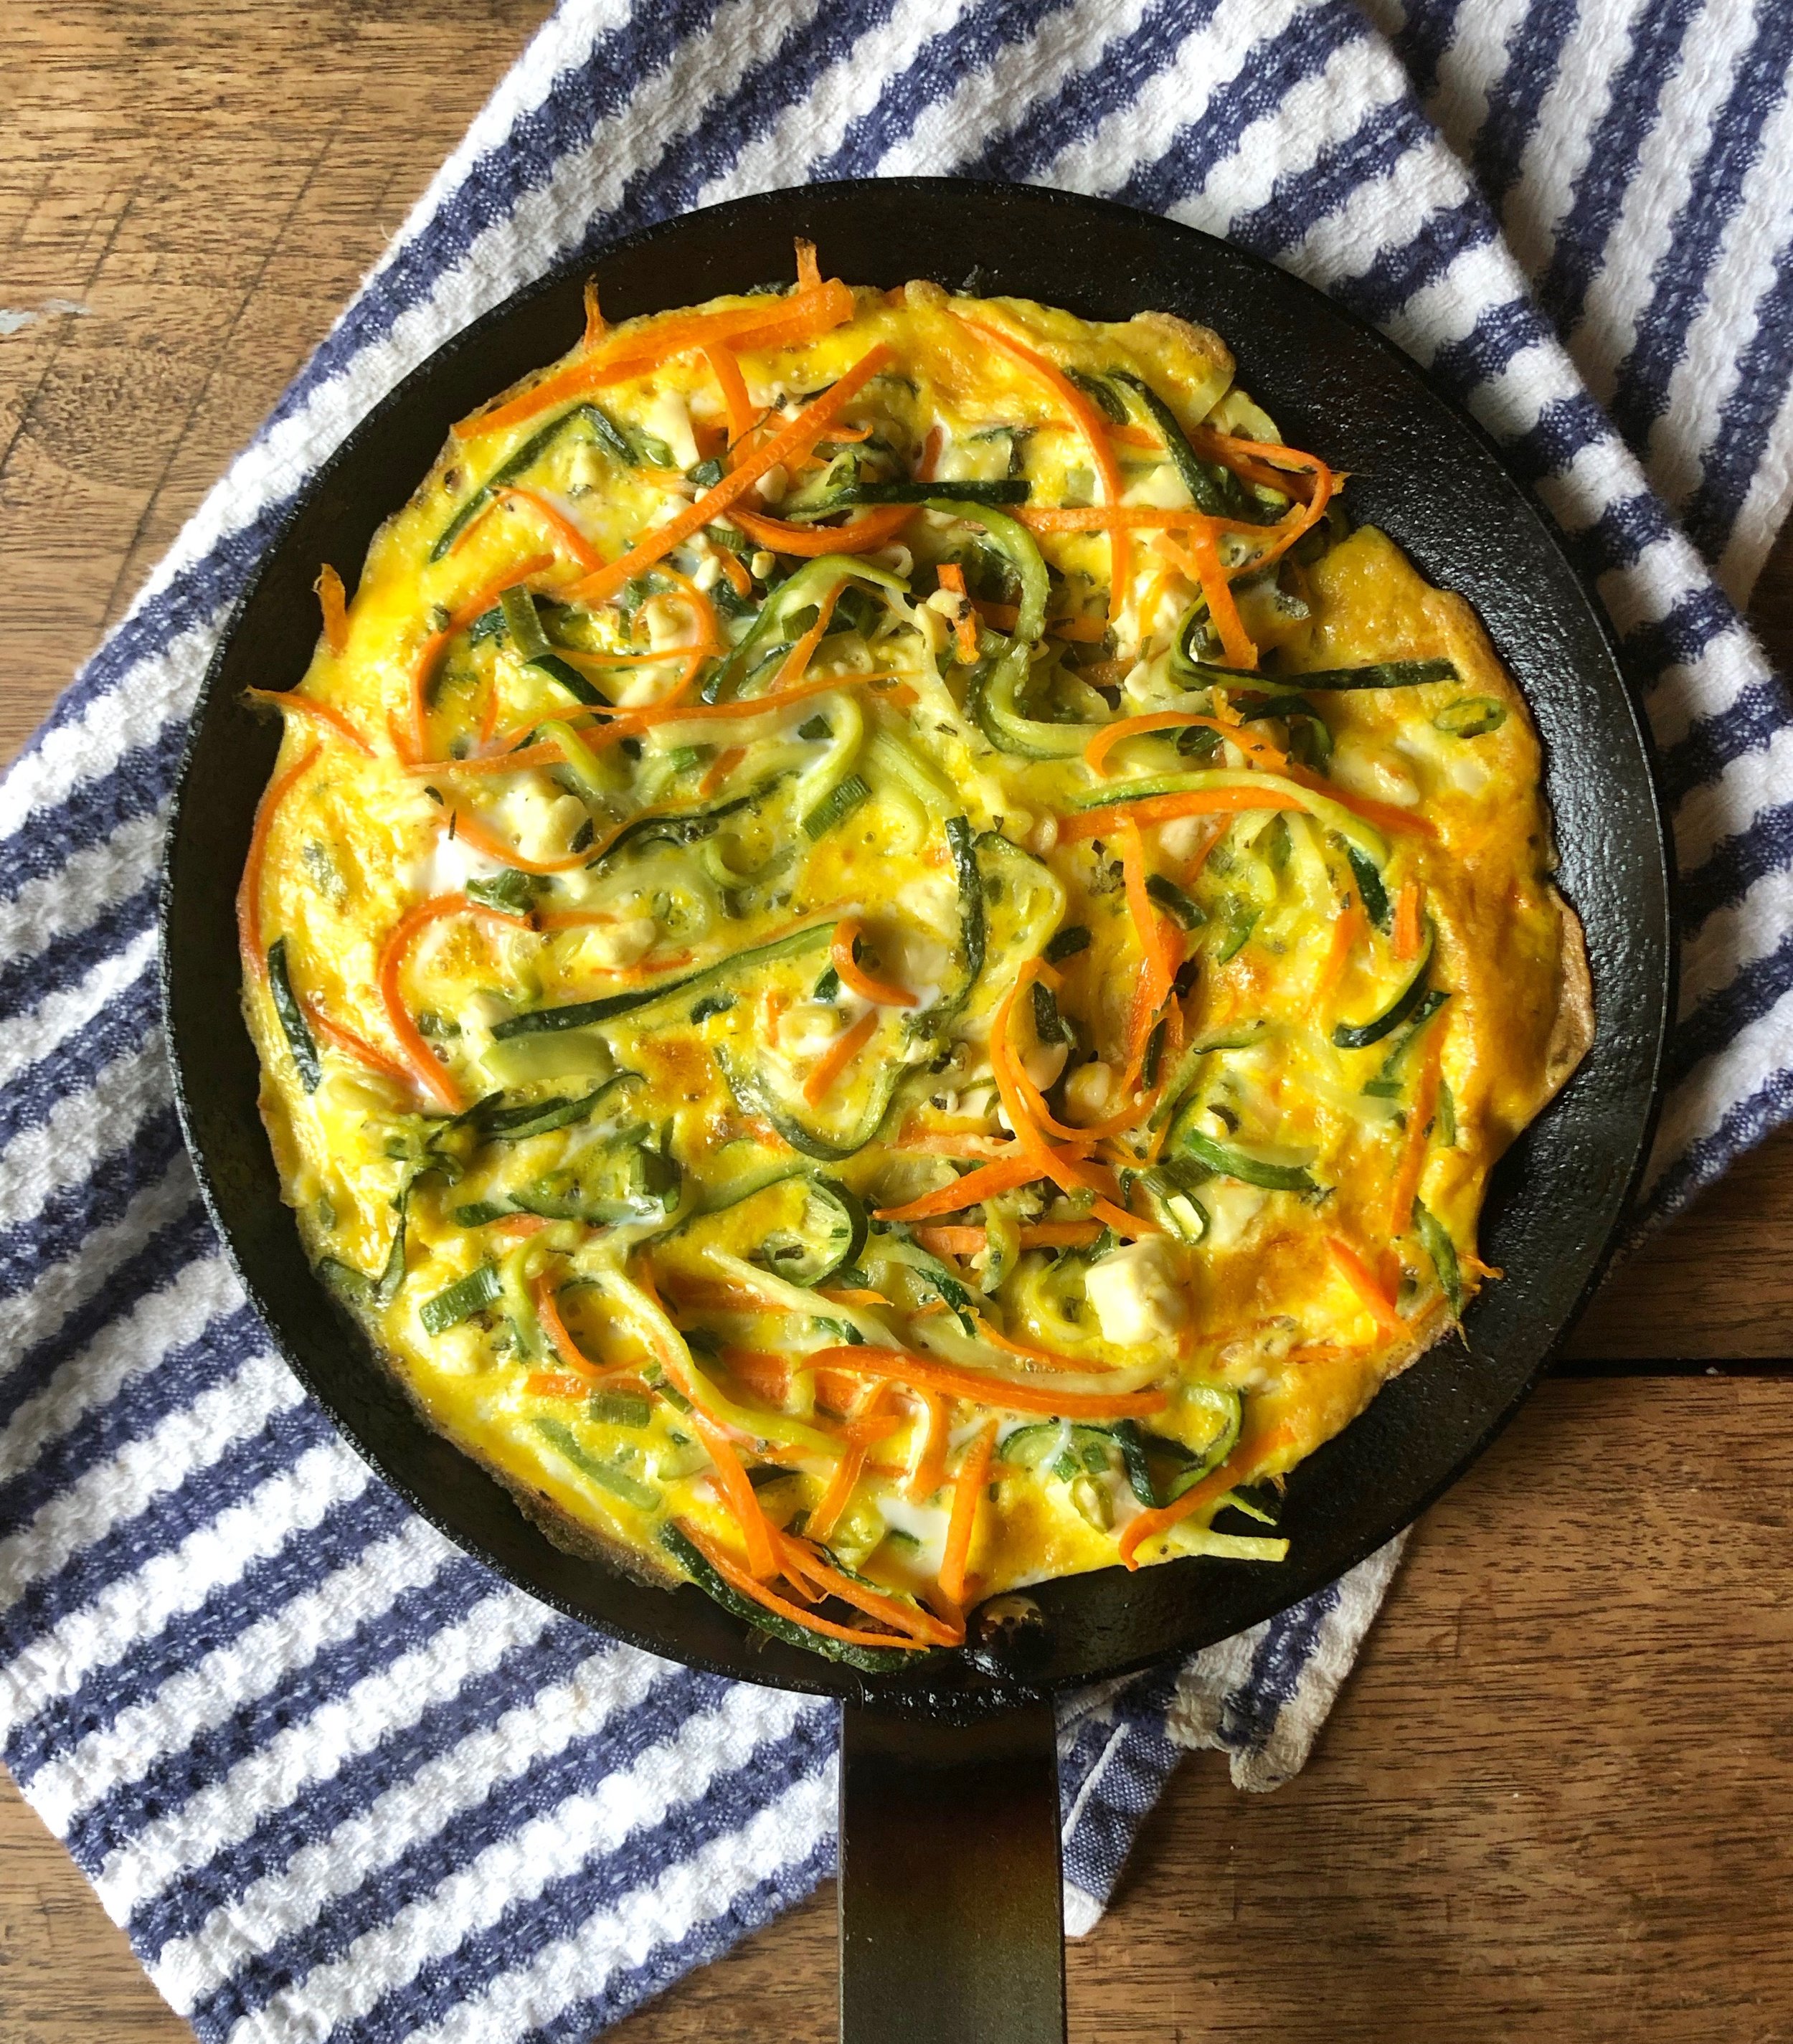
As I mentioned above, I made a double batch and enjoyed leftovers for days. I had them as a simple side dish, piled on a burger (really good), and atop a farro bowl (also very good). But my favorite way to enjoy the leftovers was in an individual frittata! I just warmed some up in my favorite little 8-inch skillet, and then poured two beaten eggs on top. I cooked this stovetop on medium heat for a couple minutes, then finished under the broiler for a couple minutes. So good!!

IMG_3095.jpeg

Chicken Enchilada Dip with Corn

IMG_1324.jpeg

I will pull up a chair to a bowl of dip. I will flat-out embarrass myself. I just love it—all kinds, really. I once had a dip party, where we played board games and everyone brought a dip and dippers, and now I’m wondering why that was just a one-time thing. Anyway, although I love all kinds of dips (salsa! French onion! hummus! guac! spinach-artichoke!), I especially love one that’s warm, gooey, and cheesy. Here’s a dip that hits all those notes, and it incorporates chicken for heartiness and corn for that special crisp-sweet goodness. If you happen to end up with any left over, it makes a pretty great filling for jalapeño poppers—maybe sprinkled with a little bacon. Just sayin’.

IMG_1330.jpg
Yield: Serves 10 (serving size: about 1/4 cup)

Chicken Enchilada Dip with Corn

prep time: 10 minscook time: 23 minstotal time: 33 mins

This warm, creamy dip is a real crowd pleaser. It’s a little indulgent. I’m not claiming it’s light—but I do include the nutrition info so you know what you’re getting into (it’s not that bad). The little corn kernels offer a sweet, crunchy pop in every bite—that is, if you use fresh corn (frozen won’t be quite as crisp). As always, please shred your own cheese. The preshredded stuff is coated with starch to prevent it from clumping, and it won’t melt as creamy as cheese you prep yourself. Serve the dip with tortilla chips, pita chips, and/or assorted crudités.

ingredients:

  • 5 green onions, thinly sliced and divided
  • 1 Tbsp. canola oil
  • 2 large garlic cloves, minced
  • 1 cup fresh or frozen, thawed corn kernels
  • 1/2 cup green chile enchilada sauce (I used Frontera)
  • 1 (8-oz.) package 1/3-less-fat cream cheese
  • 1/4 tsp. kosher salt
  • 1/4 cup canola mayonnaise
  • 1 cup shredded skinless, boneless rotisserie chicken breast (4 oz.)
  • 4 oz. pepper Jack cheese, shredded and divided (about 1 cup)
  • Sliced green onions, sliced jalapeño, and extra corn kernels for garnish (optional)

instructions:

  1. Preheat oven to 400°F.
  2. Separate the bottom white part of onions from the green onion tops. Heat a large skillet over medium heat. Add oil; swirl to coat. Add white onion bottoms and garlic; cook 2 minutes, stirring frequently. Add corn; cook 3 minutes, stirring frequently. Stir in green onion tops, enchilada sauce, cream cheese, and salt. Cook until cream cheese melts, stirring frequently. Stir in mayonnaise. Gently fold in chicken and half of pepper Jack.
  3. Spoon mixture into an oven-safe 3-cup baking dish. Top evenly with remaining pepper Jack. Bake at 400°F until bubbly around the edges and cheese on top melts, about 15 minutes.

NOTES:

Calories 159; Fat 12g (sat 5g); Protein 6g; Carb 6g; Fiber 0g; Sugars 2g (added sugars 0g); Sodium 303mg
Created using The Recipes Generator

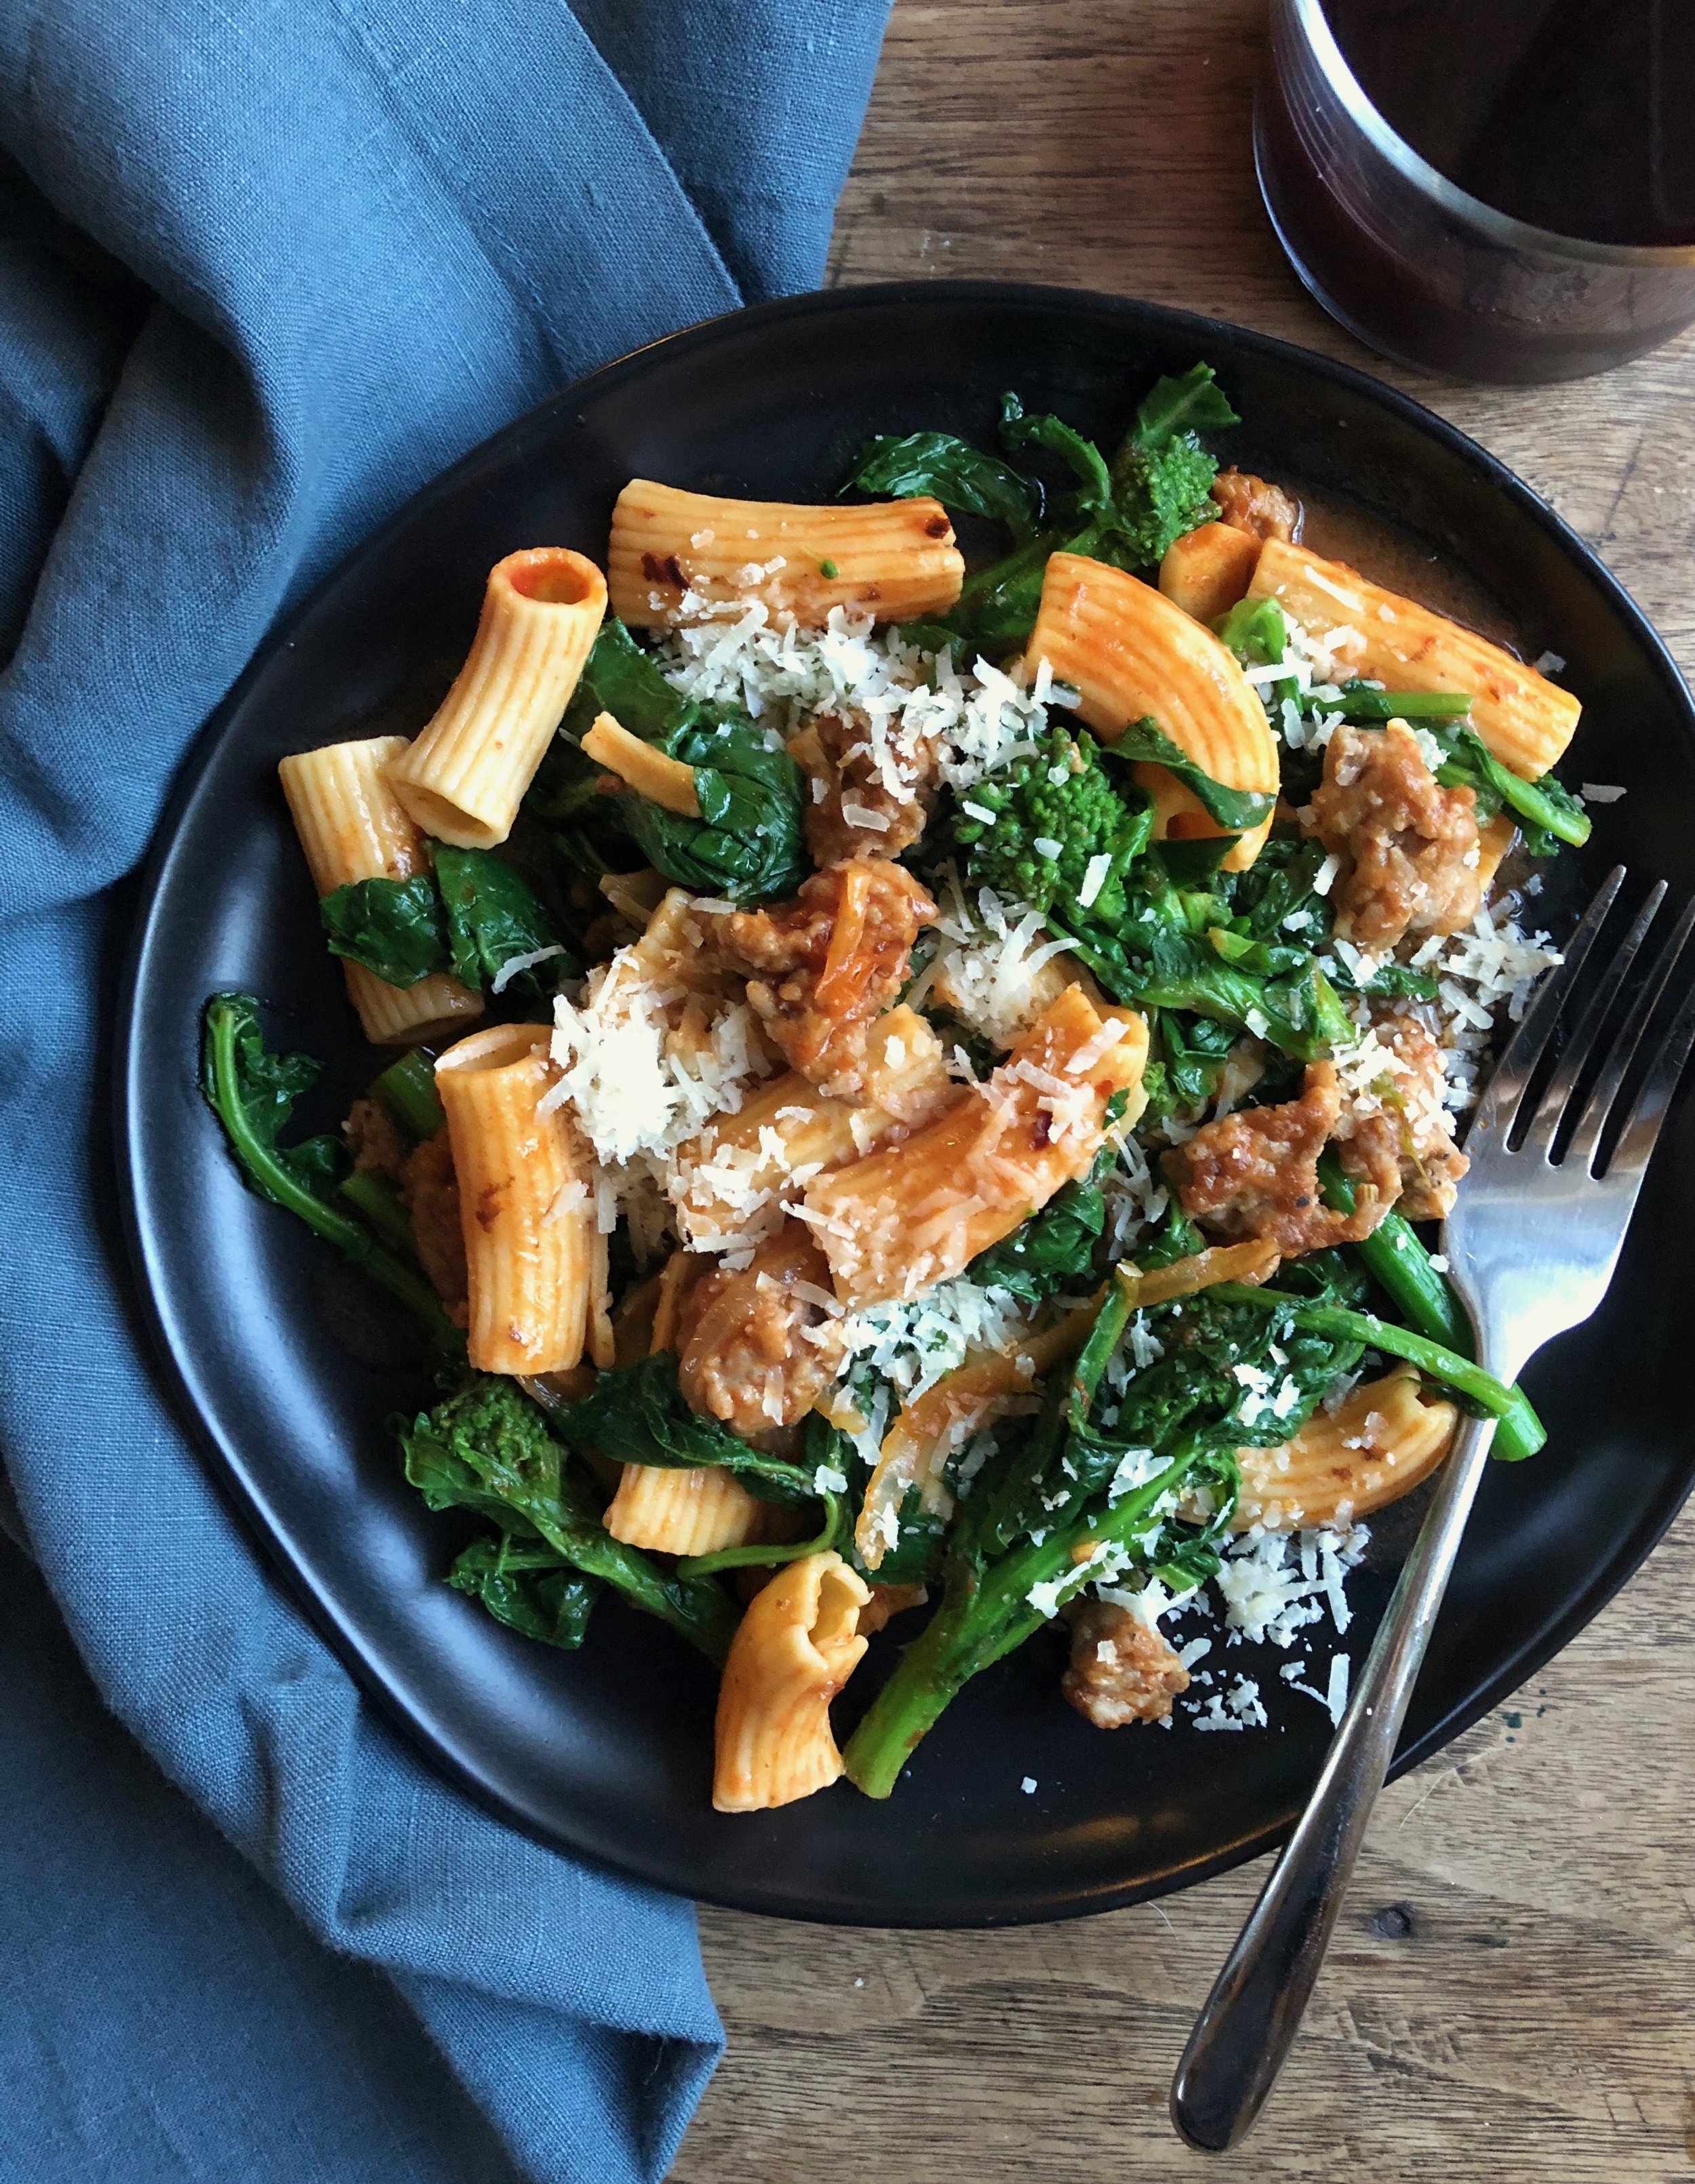
Chickpea Pasta with Broccoli Rabe and Sausage

IMG_1188.jpeg
Yield: Serves 4 (serving size: 2 cups pasta and 1 Tbsp. cheese)

Chickpea Pasta with Broccoli Rabe and Sausage

prep time: 10 minscook time: 20 minstotal time: 30 mins

This is one of those fallback recipes you can count on when you have little time to cook but want something really good, really comforting, and really easy. My hubs said it felt creamy and indulgent, but it’s actually quite light at only about 400 calories. The serving size is large, too (2 cups!), and all that fiber (13 grams!) will fill you right on up. A good bit of the fiber comes from the chickpea pasta, which I adore; if you sub traditional pasta, the fiber will go down considerably. I love the bite of broccoli rabe—and, luckily, so do my kids—but if you’re not a fan of its bitter edge, you can sub broccolini or broccoli.

ingredients:

  • Cooking spray

  • 8 oz. sweet Italian sausage

  • 2 Tbsp. extra-virgin olive oil

  • 1 cup vertically sliced white or yellow onion

  • 1/4 to 1/2 tsp. crushed red pepper

  • 1 lb. broccoli rabe (rapini), trimmed

  • 8 oz. uncooked chickpea pasta—rigatoni, penne, cavatappi, or rotini

  • 5 garlic cloves, thinly sliced

  • 3 Tbsp. tomato paste

  • 1/2 tsp. kosher salt

  • 1 oz. Parmigiano-Reggiano cheese, grated (about 1/4 cup)


instructions:

  1. Bring a large pot of water (such as a Dutch oven or small stockpot) to a boil. 

  2. While water comes to a boil, heat a large skillet (not nonstick) over medium-high heat. Coat pan with cooking spray. Add sausage; cook, stirring frequently to crumble, until browned and cooked through (about 6 minutes). Remove sausage from pan, reserving drippings. 

  3. Reduce heat to medium-low. Add oil to drippings in pan; swirl to coat. Add onion and red pepper to pan; cook, stirring occasionally, until onion is very soft (about 10 minutes).

  4. Meanwhile, add broccoli rabe to boiling water; cook 2 minutes. Remove from water with tongs (reserving boiling water), place in a colander, and rinse with cold water until cool. Drain well; cut into 2-inch pieces. Add pasta to boiling water; cook until al dente (about 8 minutes). Be careful not to overcook, as chickpea pasta falls apart when cooked too long. Reserve 1 1/4 cups pasta water; drain pasta.

  5. Add garlic to onion mixture in pan; cook 2 minutes. Add tomato paste; cook, stirring constantly, for 1 minute. Stir in 3/4 cup pasta water and salt. Add pasta, sausage, and broccoli rabe; stir very gently to combine. Stir in additional pasta water as needed to form the sauce. Sprinkle with cheese.

NOTES:

Calories 409; Fat 17g (sat 6g); Protein 30g; Carb 41g; Fiber 13g; Sugars 7g (added sugars 0g); Sodium 654mg
Created using The Recipes Generator

Shrimp and Vegetable Curry with Cauliflower Rice

IMG_1150.jpg
Yield: 4 servings (serving size: 3/4 cup cauliflower rice, 4 oz. shrimp, & 3/4 cup sauce)

Shrimp and Vegetable Curry with Cauliflower Rice

prep time: 8 minscook time: 12 minstotal time: 20 mins

How about a 20-minute dinner that tastes like it took an hour? That's loaded with vegetables, too? This recipe delivers all that and is mild enough—and creamy enough—to satisfy everyone at the table. My kids hugged me after eating this, and I'll take that as pretty darn high praise! Do take note that it's a bit of a splurge. Though the calories are low (under 400 calories), the saturated fat is on the high side; try to balance out the rest of your day with food that's lower in sat fat. I do think it's worth it to go full fat with the coconut milk here for the most satisfying, creamy texture. Just think of it as a splurge, something to enjoy every now and then. Or hell, maybe once a week! And don't forget to squeeze on a little lime juice before tucking in; it's the perfect finishing touch, brightening the whole bowl.

ingredients:

  • 2 Tbsp. canola oil, divided
  • 1 cup vertically sliced yellow onion
  • 1 medium zucchini, chopped
  • 5 garlic cloves, minced and divided
  • 1 Tbsp. red curry paste (I used Thai Kitchen)
  • 1 tsp. brown sugar
  • 2 tsp. fish sauce
  • 1 (13.6-oz.) can coconut milk (full-fat)
  • 1 lb. raw large shrimp, peeled and deveined
  • 6 oz. fresh baby spinach
  • 1 lb. riced cauliflower (I used fresh, not frozen)
  • 1/4 cup chopped fresh cilantro, plus more for garnish
  • Thinly sliced Fresno or red jalapeño peppers (optional)
  • Lime wedges

instructions:

  1. Heat a large skillet or sauté pan over medium-high heat. Add 1 tablespoon oil; swirl to coat. Add onion and zucchini; sauté 3 minutes. Add half of garlic; sauté 2 minutes. Add curry paste; cook 30 seconds, stirring constantly. Stir in sugar, fish sauce, and coconut milk; bring to a simmer.
  2. Add shrimp; cover and cook until shrimp are almost done, about 2 minutes. Add spinach; cover and cook until spinach wilts, about 2 minutes. Stir gently to combine.
  3. Meanwhile, heat another large skillet over medium-high heat. Add remaining 1 tablespoon oil; swirl to coat. Add cauliflower and remaining half of garlic; sauté until crisp-tender, about 4 to 5 minutes. Stir in chopped cilantro. Divide cauliflower rice evenly among 4 bowls; top evenly with shrimp and sauce. Top with Fresno/jalapeño slices and additional cilantro, if desired. Serve with lime wedges.

NOTES:

Calories 376; Fat 21g (sat 13g); Protein 33g; Carb 14g; Fiber 5g; Sugars 9g (added sugars 1g); Sodium 766mg
Created using The Recipes Generator

White Chicken Chili with Poblanos

IMG_0876.jpeg

A big pot of chili just screams comfort and goodness. But you don’t always have hours to devote to one, y’know? This chicken chili, with a broth that’s both, well, brothy and slightly creamy, takes only a little more than a half-hour to make. It’s deeply savory and full of flavor, thanks to a few well chosen ingredients. The broth gets its body from pureed beans (it’s not thickened with flour), so it’s gluten free. You’ll be happy you made it whether it’s a cold, damp night or a warm evening—it’s an all-weather chili!

Yield: 8 servings (serving size: about 1 1/3 cups)

White Chicken Chili with Poblanos

prep time: 10 minscook time: 25 minstotal time: 35 mins

This hearty pot of chili comes together from start to finish in only 35 minutes, thanks to a trifecta of smart convenience products: rotisserie chicken, canned beans, and bottled tomatillo salsa. The salsa gives the broth loads of flavor, and all you have to do is twist open the lid. Know that poblano peppers can be tricky: Sometimes they’re as mild as bell peppers, and other times they’re hotter than jalapeños. If yours is particularly spicy (be brave and touch a piece to your tongue), use just one pepper—or go for it with two if you’re a hothead.

ingredients:

2          Tbsp. canola oil

2          cups chopped white onion

2          poblano peppers, seeded and chopped

6          large garlic cloves, minced

2          tsp. ground cumin

1          tsp. dried oregano

4          cups unsalted chicken stock (I used Swanson), divided

1          cup bottled tomatillo salsa (I used Frontera)

1          tsp. kosher salt

1          tsp. freshly ground black pepper

3          (15-oz.) cans unsalted cannellini beans, rinsed, drained, and divided

4          cups shredded boneless, skinless rotisserie chicken, white and dark meat (about 1 lb., 1 small rotisserie chicken)

3/4      cup thinly sliced radishes

1/2      cup thinly sliced green onions

2          ripe peeled avocados, thinly sliced or chopped

1          jalapeño pepper, thinly sliced (optional)

instructions:

1. Heat oil in a large Dutch oven over medium heat. Add onion and poblanos; cook 5 minutes, stirring occasionally. Add garlic; cook until onion is tender, stirring frequently, about 4 minutes. Stir in cumin and oregano; cook 1 minute, stirring constantly.


2. Stir in 3 1/2 cups chicken stock, salsa, salt, black pepper, and bay leaves; bring to a boil. Reduce heat, and simmer 10 minutes. 


3. Meanwhile, combine remaining 1/2 cup stock and 1 can of beans (about 1 1/2 cups) in a blender; process until smooth. Stir bean puree and remaining 2 cans of beans into pan; return to a simmer. Add chicken; simmer 5 minutes. 


4. Ladle about 1 1/3 cups chili into each of 8 bowls; top servings evenly with radishes, green onions, avocados, and jalapeño, if desired.

NOTES:

Calories 357; Fat 12g (sat 2g); Protein 30g; Carb 35g; Fiber 11g; Sugars 2g (added sugars 0g); Sodium 653mg
Created using The Recipes Generator

Herby Buttermilk Ranch Dressing

IMG_0622.jpeg

Everyone needs a good recipe for great ranch dressing, right? This one is easy, fresh, and packed with flavor. It’s really good served very cold—either draped over crisp greens or as a dip for veggies. My current favorite way to have it is shown above: a simple iceberg (yes!) salad with sliced grape tomatoes and bacon. Simple can be so good.

Yield: 8 servings (serving size: 2 tablespoons)

Herby Buttermilk Ranch Dressing

prep time: 10 minscook time: total time: 10 mins

Confession: I like ranch dressing. Not the bottled stuff, which I think is pretty bland. No, I mean homemade buttermilk ranch. I like it loaded with fresh herbs and with a little bite from fresh garlic, which is what makes it so good. I also like it served very cold over equally cold crisp greens like romaine (when it's not being recalled), Little Gem lettuce, or iceberg lettuce, which I've recently rediscovered. The recipe here is for the dressing alone; the salad shown is just a serving suggestion. You might want to go ahead and double the recipe; it's a good thing to keep on hand.

ingredients:

  • 1/2 cup whole buttermilk
  • 1/2 cup mayonnaise (I use Duke's; I'm Southern...)
  • 2 Tbsp. chopped fresh chives
  • 1 Tbsp. chopped fresh dill
  • 1 Tbsp. apple cider vinegar
  • 2 tsp. chopped fresh thyme
  • 1/2 tsp. kosher salt
  • 1/2 tsp. freshly ground black pepper
  • 1 small garlic clove, grated on a Microplane

instructions:

  1. Place all ingredients in a medium bowl; whisk until well combined. I like to chill mine until very cold before serving, about an hour or so.

NOTES:

Calories 111; Fat 12g (sat 2g); Protein 1g; Carb 1g; Fiber 0g; Sugars 1g (added sugars 0g); Sodium 183mg
Created using The Recipes Generator

Kale Salad with Pears, Pomegranates, and Pickled Onions

IMG_0445.jpeg

Every Thanksgiving table should include a big, fresh salad. With all the rich casseroles, gravy, and savory (and sometimes surprisingly sweet) sides, something fresh is a necessity. Whenever I bust up a big salad into the Turkey Day mix, I’m often met with jokes and gentle ribbing. But you know what? My salad always gets eaten. Every freaking leaf. This is a great one for Thanksgiving or Friendsgiving because it can easily accommodate dietary needs and restrictions: It’s vegan and gluten-free, and if someone has a nut allergy, you can easily omit the pecans.

Yield: 8 (serving size: about 1½ cups)

Kale Salad with Pears, Pomegranates, and Pickled Onions

prep time: 35 minscook time: 5 minstotal time: 40 mins

I have a real problem with lame salads, those that feel like an afterthought. Salads, after all, are a great opportunity to play with texture, flavor, and color, bringing all those elements into harmonious balance. This one does just that, combining earthy-chewy lacinato kale, sweet-juicy pears, toasty-crunchy pecans, and tart-crisp pickled onions. I happened upon a bag of petite Seckel pears at my local Publix store, which I think makes this salad feel a little special—but any sweet pear will work beautifully here. You don’t have to cut them the way I did (using a mandoline); you can just quarter, core, and thinly wedge or slice them. See below for tips and technique photos.

ingredients:

  • 1 cup mirin (sweet rice wine—see photo below)
  • ½ cup natural rice vinegar
  • 1 medium red onion, vertically sliced

  • 2 (8-oz.) bunches lacinato kale
  • 3 Seckel pears or 1½ Bartlett or Anjou pears, thinly sliced
  • ½ cup pomegranate arils (about ½ large pomegranate)
  • ½ cup pecan halves, toasted
  • 6 Tbsp. extra-virgin olive oil, divided
  • 3 Tbsp. natural rice vinegar
  • 1 Tbsp. maple syrup
  • 1 Tbsp. whole-grain Dijon mustard
  • ¾ tsp. kosher salt
  • ½ tsp. black pepper
  • 1 small garlic clove, grated on a Microplane

instructions:

  1. Combine mirin and ½ cup vinegar in a small saucepan; bring to a boil. Add onion; return to a boil, and immediately remove from heat. Let stand 30 minutes or until cooled to room temperature. You can make the pickled onions a week ahead; refrigerate in an airtight container. 

  2. Meanwhile, remove stems from kale and discard. Tear leaves into pieces. Place kale in a large bowl; drizzle with 1 tablespoon oil. Massage oil into kale leaves until leaves slightly wilt. Add pears, pomegranate, and pecans to kale; toss gently to combine. Remove half of onion from mirin mixture with a slotted spoon; add to salad. (Reserve remaining onion for another use) 

  3. Combine remaining 5 tablespoons oil, 3 tablespoons vinegar, syrup, mustard, salt, pepper, and garlic in a jar; close with lid, and shake until emulsified. Drizzle over salad.

NOTES:

Calories 196; Fat 16g (sat 2g); Protein 3g; Carb 13g; Fiber 3g; Sugars 8g (added sugars 2g); Sodium 168mg
Created using The Recipes Generator

The first step for this salad is to make a batch of pickled onions. I have you make double what you need for the salad—because why not go ahead and use a whole onions?

IMG_0480.jpeg

The leftover pickled onions will hold up well in the fridge for a couple of weeks, and you can use them on tacos, other salads, grain bowls, and more. My easy two-ingredient method relies on two products from the Asian foods aisle: mirin and rice vinegar. These guys:

IMG_0432.jpeg

You can find rice vinegar at any supermarket and mirin at most (I got mine at Target). The mirin is seasoned with salt and sugar plus has a pleasant, light wine flavor—so it takes the place of wine, salt, and sugar. The rice vinegar is softer than many other vinegars, which could make the pickled onions sharp and wince-inducing.

I love lacinato kale for its bumpy texture and earthy and faintly sweet flavor. If you can’t find it, you can use regular curly kale—just know that it’s a little tougher. No matter which you use, do take a minute or two to massage the leaves with a little oil first, to help break down the fibers and tenderize the leaves.

As for the pears, as I mentioned above, I lucked into some gorgeous Seckel pears at the Publix down the road. They come in a bag, like this:

IMG_0436.jpeg

And they’re smaller than most pears. See?

IMG_0438.jpeg

Now for the pomegranates. Look, I know that the arils you can buy in the little cups are very convenient. I’ve used them myself on more than one occasion. But they just don’t taste as good as ones you pull fresh from the whole fruit. I learned a trick that makes that process a little easier. First, cut about 1/4-inch off the top of the fruit, like so:

IMG_0439.jpeg

One you take the “lid” off, you can see where the paper-thin membranes are. It’s a little tricky to see in the photo above, but look for the spoke-like thin white membranes that grow out from the core. You want to score the outer skin of the pomegranate where those membranes run, from the top to the bottom of the fruit, like this:

IMG_0441.jpeg

Once the skin is scored, you can pull apart the fruit. It will break along those “fault lines” like so—

IMG_0442.jpeg

Now you can just gently prod those arils out without having to pick through all the pith and membrane. I swear it’s worth the effort (and there’s not much effort to it).

This salad will fill a big ol’ bowl (meaning it makes a lot). But I predict it will all get happily eaten, with thanksgiving.

Slow-Roasted Salmon with Orange-Olive Salsa

IMG_0301.jpg
Yield: 4 (serving size: 1 fillet and 1/4 cup salsa)

Slow-Roasted Salmon with Orange-Olive Salsa

This slow, gentle roasting technique might just become your new favorite way to cook salmon. The low heat (only 250°F) keeps the flesh super-unctuous and oily-rich, and pretty much assures you won’t overcook the fish. The accompanying salsa is the perfect partner, with its bright pop of juicy citrus and meaty bits of buttery Castelvetrano olives (can we all just agree that they’re the best olives?).

prep time: 20 minscook time: 20 minstotal time: 40 mins

ingredients

  • 4 (6-oz.) salmon fillets (I used skin-on, sustainable farmed salmon)
  • Cooking spray
  • 1/2 tsp. kosher salt, divided
  • 1/4 tsp. black pepper
  • 2 Tbsp. extra-virgin olive oil, divided
  • 2 navel oranges

  • 1/2 cup coarsely chopped pitted Castelvetrano olives (about 16 olives)
  • 1/4 cup fresh flat-leaf parsley leaves
  • 2 Tbsp. slivered shallot or red onion
  • 1/4 tsp. crushed red pepper

instructions

  1. Let salmon fillets stand at room temperature for 20 to 30 minutes to take the chill off. Preheat oven to 250°F.

  2. Arrange fillets in an 11 x 7–inch baking dish coated with cooking spray. Sprinkle with 3/8 tsp. salt and black pepper. Drizzle evenly with 1 tablespoon oil.
  3. Grate 1/2 teaspoon zest from one of the oranges; set zest aside. Remove peel and all pith from both oranges; slice between membranes to remove orange sections. Place sections in a medium bowl. Hold orange membranes over salmon in baking dish, and squeeze juice over fillets.
  4. Bake fillets at 250°F for 20 to 25 minutes, to desired degree of doneness. (Mine were to my liking right at 20 minutes.)
  5. Meanwhile, add olives, parsley, shallot, red pepper, orange zest, remaining 1 tablespoon oil, and 1/8 teaspoon salt to orange sections; toss gently to combine. Serve salsa with salmon.

NOTES:

Calories 397; Fat 27g (sat 5g); Protein 27g; Carb 11g; Fiber 2g; Sugars 8g (added sugars 0g); Sodium 538mg
Created using The Recipes Generator
IMG_0297.jpg

OK, so maybe you’re not sold yet on this idea. Let me try to get you there… Have you ever bought some beautiful salmon fillets, anticipating that oily, silky, fatty-in-all-the-good-ways texture, only to overcook the fish (even slightly) so that the texture falls flat? Yeah, that won’t happen with this slow-roasting method. It cooks the fish ever so gently so that it never loses that buttery silkiness you crave.

This recipe is pretty simple—not too much technique to explain. The hardest part is maybe sectioning the orange?? But even that isn’t hard. Just cut away all the peel and pith, and then cut between the membranes to extract the sections. Like this:

IMG_0275.jpg

After you’ve removed all the sections, don’t toss the membranes just yet. Hold on to these guys—

IMG_0276.jpg

And squeeze them over the fillets in the baking dish, like so:

IMG_0283.jpg

Then bake for a short 20ish minutes, and you’ll be delighted by the results. No. More. Overcooked. Salmon. I mean, just look at this texture!

IMG_0303.jpg