Lady Pea and Tomato Salad

P1110285.jpeg

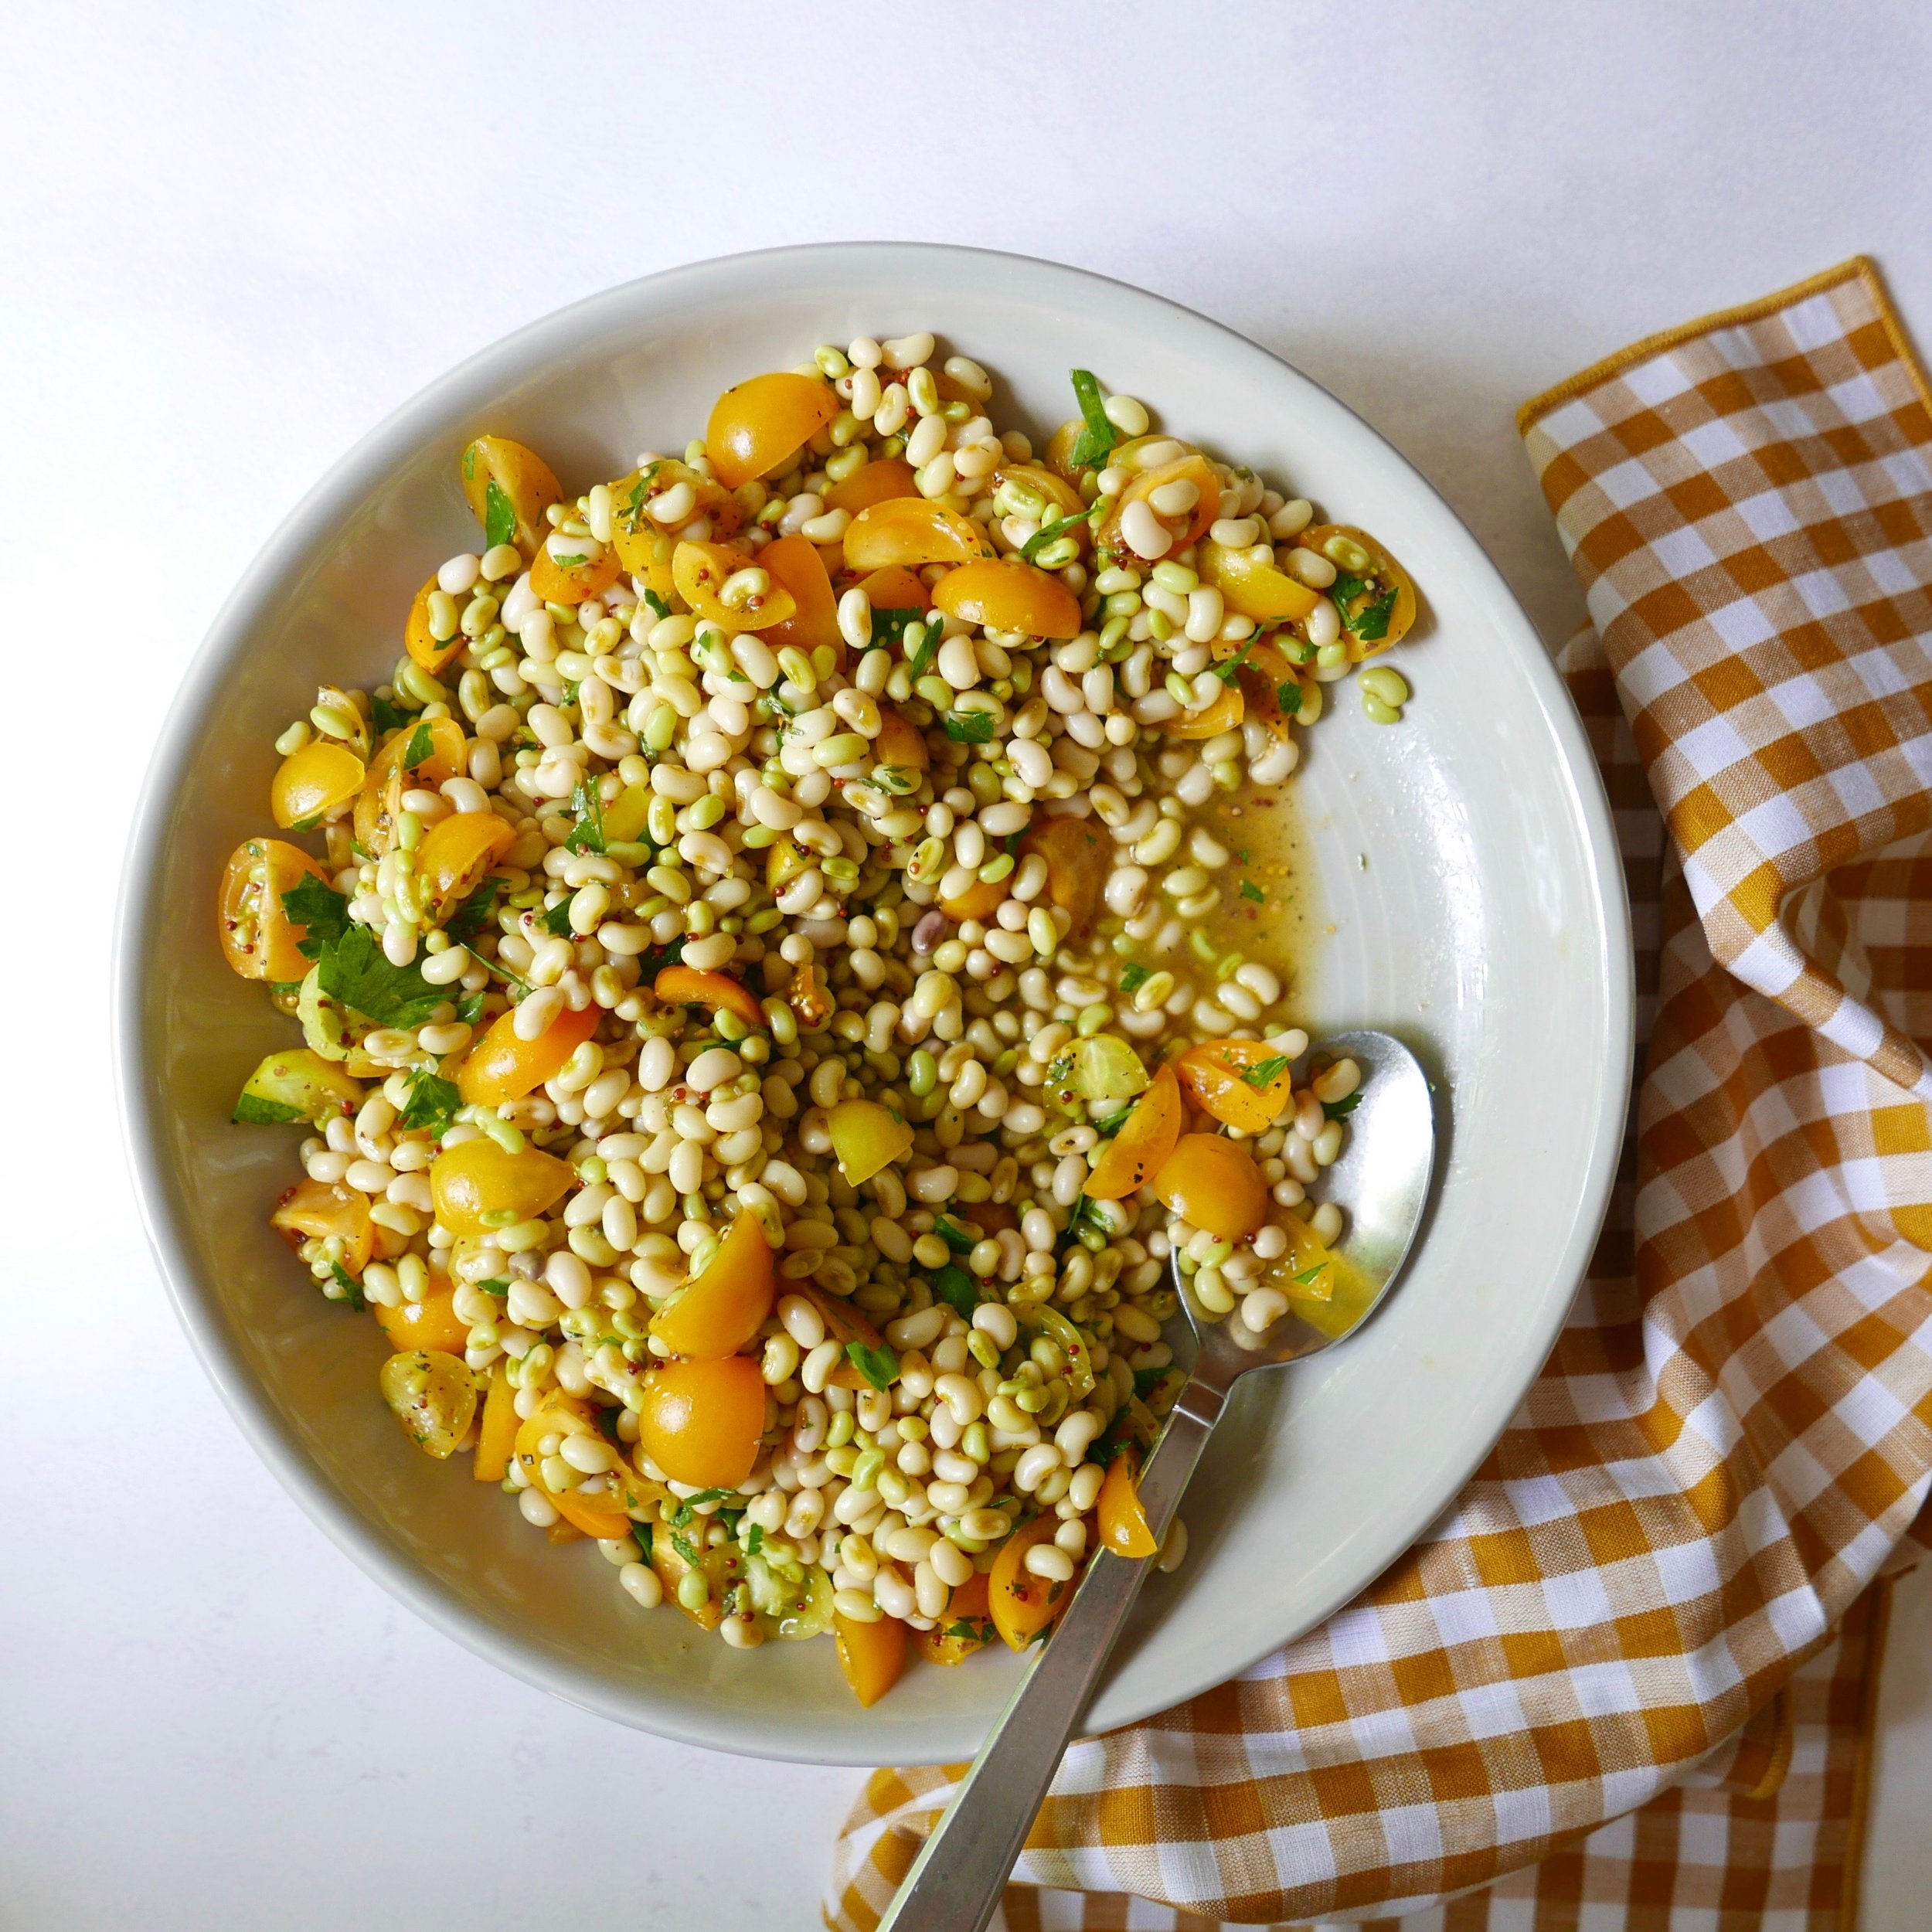
One of my favorite things about summer is that fresh Southern field peas are easy to find, at least around Birmingham and other places in the South. One particular type of field pea—lady peas—are probably my all-time favorite summer ingredient, and I love to cook up a pot to serve warm as a side—or turn them into a lovely salad as I’ve done here. It’s a versatile side, full of fresh summer flavor. It goes on repeat around here all throughout the season. Be sure to scroll below for more info on lady peas.

Yield: 6 (serving size: about 1 scant cup)
Author: Ann Taylor Pittman

Lady Pea and Tomato Salad

prep time: 15 Mcook time: 20 Mtotal time: 35 M
This is one of my all-time favorite summer sides. Why? Because it goes with anything (burgers, steaks, grilled fish, seared scallops), because I can make it ahead and serve it at room temperature, and because it just tastes so good--clean, simple, wonderful flavors. See below for more info on lady peas. If you can't find them, you can sub fresh lima beans.

ingredients:

  • 1 lb. fresh shelled lady peas (see note below)
  • 4 cups water
  • 2 bay leaves
  • 3 thyme sprigs
  • 2 cups quartered cherry tomatoes (I used yellow ones)
  • 3/4 tsp. kosher salt, divided
  • 1/2 tsp. freshly ground black pepper, divided
  • 2 Tbsp. extra-virgin olive oil
  • 1 Tbsp. red wine vinegar
  • 1 Tbsp. whole-grain Dijon mustard
  • 2 tsp. chopped fresh thyme

instructions:

How to cook Lady Pea and Tomato Salad

  1. Combine peas, water, bay leaves, and thyme sprigs in a large saucepan. Bring to a boil over high heat. Reduce heat, and simmer until peas reach desired degree of tenderness, 20 to 30 minutes. Drain peas and rinse with cold water. Discard bay leaves and thyme sprigs.
  2. Meanwhile, combine tomatoes, 1/2 teaspoon salt, and 1/4 teaspoon pepper; let stand 20 minutes while peas cook.
  3. Combine remaining 1/4 teaspoon salt, remaining 1/4 teaspoon pepper, oil, vinegar, mustard, and chopped thyme in a small jar; shake well until emulsified. 
  4. Combine peas, tomatoes and all their juices, and dressing in a large bowl; toss well to combine. Serve chilled or at room temperature. 

NOTES:

Calories 126; Fat 5g (sat1 g); Protein5 g; Carb 15g; Fiber 5g; Sugars 4g (added sugars 0g); Sodium 156mg
Created using The Recipes Generator

About Lady Peas

Lady peas are a type of Southern field pea with a clean flavor and less-starchy texture than other varieties, such as crowder peas or pink-eye peas/purple hull peas. They have a delicate flavor and wonderful creamy texture that is just something special. If I’m cooking up a pot to enjoy as a warm side dish, I’ll first sauté onions, then add the peas, bay leaves, thyme sprigs, and chicken stock to cover. Once the peas reach the level of tenderness I like, I’ll take them off the stove and just let them sit for a bit. I find that this step (letting them rest) produces amazing results—the creamiest texture throughout. For this salad, though, I like to keep the texture a teensy bit firmer, so I skip that step. Here’s what shelled lady peas look like:

P1110278.jpeg

Aren’t they pretty? Well, I think they are. I can usually find them easily from June till late July at farmers markets and farm stands. Here’s a little more about lady peas from the good folks at Southern Living, if you care to learn more about them. If I can ever find them still in their pods (surprisingly hard to find), I snatch them up—because shelling peas is one of my favorite things to do.

You can turn this salad into a main by adding some protein—some grilled chicken or shrimp, sliced steak, or my favorite, seared scallops:

P1110308.jpeg

Beet and Cherry Salad with Pistachio-Mint Gremolata

P1110297.jpeg

A few weeks back, I played with a monochromatic golden beet and mango salad. It was so stinking good that I thought, welp, why not try a monochromatic red beet salad? So I paired the earthy roots with sweet Bing cherries, and it was a match made in heaven! As always, I give you the recipe up front here, and the notes and tips are below.

Yield: 4 (serving size: about 1 cup)
Author: Ann Taylor Pittman

Beet and Cherry Salad with Pistachio-Mint Gremolata

prep time: 30 Mcook time: 6 Mtotal time: 36 M
Wow, what a great combo! Sweet, juicy cherries and earthy beets form a gorgeously monochromatic base for a salad featuring a lovely whiff of cardamom in its dressing. The pistachio-mint-lemon gremolata offers a pop of contrasting color, crunch, and flavor. I use a quick microwave method to "roast" the beets, so the salad comes together quickly. You can make the salad and the gremolata a day or two ahead; just store them separately until ready to serve.

ingredients:

  • 1 lb. small trimmed beets (for me, this was 6 beets)
  • 1 lb. sweet cherries
  • 2 Tbsp. extra-virgin olive oil
  • 1 1/2 Tbsp. white balsamic vinegar
  • 1 tsp. Dijon mustard
  • 1 tsp. honey
  • 1/2 tsp. kosher salt
  • 1/4 tsp. freshly ground black pepper
  • 1/8 tsp. ground cardamom
  • 1/4 cup chopped unsalted roasted pistachios
  • 1 Tbsp. finely chopped fresh mint
  • 1 1/2 tsp. grated lemon zest (from 1 large lemon)

instructions:

How to cook Beet and Cherry Salad with Pistachio-Mint Gremolata

  1. Pierce each beet once with the tip of a small knife. Place beets on a large sheet of microwave-safe parchment paper; wrap tightly. Microwave on HIGH for 6 minutes or until beets are tender. (If your beets are larger than mine were, they will take longer. Go in 1-minute increments until they reach the desired tenderness.) Cool beets slightly; trim off stem end, and remove skins. Cut beets into thin wedges.
  2. Meanwhile, pit cherries, and cut in half. 
  3. Combine oil, vinegar, mustard, honey, salt, pepper, and cardamom in a small jar; seal and shake well until emulsified. Combine beets and cherries in a large bowl. Drizzle with dressing; toss gently to coat.
  4. Combine pistachios, mint, and lemon zest; sprinkle over salad just before serving.

NOTES:

Calories 209; Fat11 g (sat 1g); Protein 4g; Carb 29g; Fiber 6g; Sugars 19g (added sugars 2g); Sodium 241mg
Created using The Recipes Generator

How to Microwave-Roast Beets

First, try to use small beets for even, quick cooking. Mine were between two and three ounces each. Pierce each beet once with the tip of a sharp knife, and place on a large sheet of microwave-safe parchment paper.

P1110288.jpeg

Wrap the beets tightly in the parchment paper, folding over the edges to create a good seal, and turn the package so the seams are on the bottom. Microwave like this for six minutes (or longer if your beets are larger).

P1110289.jpg

Once the beets are done, let them cool down until they’re cool enough to handle. Then you can cut off the stem end and peel off the skins.

P1110294.jpg

My Favorite Cherry Pitter

Trust me: If you make a cherry pie or cobbler or salad at least once a year, you should invest in a cherry pitter. It makes the job of loosening and removing those suckers So. Much. Easier. I love the one pictured below, which I’ve had for 10+ years. It’s made by Oxo, and it does the job really well. And the splatter guard keeps my clothes nice and clean—which means a lot to me, because I never wear an apron.

P1110291.jpeg

Marinated Zucchini Slaw

P1110260.jpeg

Have a glut of zucchini? Or just love it? Or on the lookout for a killer make-ahead side dish that everyone will want the recipe for? Look no further—Marinated Zucchini Slaw is here!

Yield: 4 (serving size: about 1 cup)
Author: Ann Taylor Pittman

Marinated Zucchini Slaw

prep time: 37 Mcook time: total time: 37 M
In the summer, when zucchini is sweetest and most abundant, I'm always looking for new ways to use it. That's how this make-ahead slaw came into being. The flavor profile leans Greek-ish, with oregano, lemon juice, olive oil, and feta, and the texture is just fantastic—crunchy, but more chewy-crunchy than crunchy-crunchy. Important first step: I salt the zucchini to draw out a lot of its moisture. That way, you won't end up with watery slaw, no matter how far ahead you make it. Trust me: I made a double batch and ate the leftovers for three days. Check out my delicious leftover makeover idea below!

ingredients:

  • 4 cups matchstick-cut zucchini (from about 1 1/2 lb. zucchini)--see notes below
  • 1 tsp. kosher salt
  • 1 cup matchstick-cut carrots
  • 1/2 cup chopped green onions
  • 1 Tbsp. finely chopped fresh oregano
  • 2 Tbsp. extra-virgin olive oil
  • 2 Tbsp. fresh lemon juice
  • 1/2 tsp. freshly ground black pepper
  • 2 oz. feta cheese, crumbled

instructions:

How to cook Marinated Zucchini Slaw

  1. Combine zucchini and salt in a large strainer or colander; toss well to coat. (Don't worry about the amount of salt—much of it drains off with the water.) Strain over the sink or over a bowl for 30 minutes.
  2. Combine carrots, green onions, oregano, oil, lemon juice, and pepper in a large bowl; toss well to combine.
  3. Pat zucchini dry on a double layer of paper towels. Add zucchini to carrot mixture; toss well to combine. Add feta; toss gently to combine.

NOTES:

Calories 124; Fat 9g (sat 3g); Protein 4g; Carb 8g; Fiber2 g; Sugars 5g (added sugars 0g); Sodium 280mg
Created using The Recipes Generator

Matchstick-Cut Zucchini

You can certainly make matchstick-cut zucchini by hand—cutting into very thin planks, then into little matchsticks. Or you can use a mandoline, if you have one. But I love using my julienne peeler for the job. I keep the stem end on the zucchini and use it as a handle, then drag the peeler down the length of the squash. I make a few strokes, until I reach the seedy middle, then rotate the zucchini and start on another side. I find that the seedy middle part doesn’t hold up well for this type of recipe. Don’t throw this core away, though. You can shred it and add to pancake or muffin batter, meatloaf, or burger patties for extra moisture. Or you can chop it up, sauté it, and use it in fried rice, soup, omelets—you name it..

IMG_3067.jpeg

Once I have a pile of long shreds, I cut them in half so the slaw is easier to eat. You could also try this recipe with zoodles (I’d cut them so they’re not so long), or with shredded zucchini.

IMG_3069.jpeg

And I know that you can buy matchstick carrots, but since you already have that julienne peeler out, why not go ahead and cut your own fresh ones? You can nibble on the cores when you’re done.

IMG_3071.jpeg

Straining the Zucchini

This step is super important. If you skip it, I promise you’ll regret it! You’ll end up with a pool of liquid at the bottom of the bowl (ever had that happen with zoodles?). Look at all the liquid that drains off!

IMG_3075.jpeg

My Favorite Way to Use the Leftovers

As I mentioned above, I made a double batch and enjoyed leftovers for days. I had them as a simple side dish, piled on a burger (really good), and atop a farro bowl (also very good). But my favorite way to enjoy the leftovers was in an individual frittata! I just warmed some up in my favorite little 8-inch skillet, and then poured two beaten eggs on top. I cooked this stovetop on medium heat for a couple minutes, then finished under the broiler for a couple minutes. So good!!

IMG_3095.jpeg

Dijon Beef Stew

IMG_0390.jpeg

This stew is basically the love child of two of my favorite recipes: Cooking Light’s Beef Daube Provençal and The New York Times’s Dijon and Cognac Beef Stew. It will make your house smell heavenly and have your family singing your praises. It’s a very easy recipe, too, and cooks hands-free for a few hours so you can tend to other things. This makes it great for a dinner party, as you can get the table set and the sides—I like to serve it with mashed potatoes and a bright, bracing salad—pulled together, not to mention yourself.

Yield: 8 servings (serving size: about 1 cup)

Dijon Beef Stew

prep time: 30 minscook time: 2 hour and 30 minstotal time: 2 hours and 60 mins

This is one of those cozy, comforting stews that will take the chill of any winter night. It's beefy, absurdly savory, and full of long-cooked flavor. I like to serve it over mashed potatoes (as shown); it's also fantastic ladled over polenta, egg noodles, grilled sourdough bread, or a baked potato. You can make this in a slow cooker—starting with step 4 and cooking on LOW for about 6 hours—but I promise this tastes better when you cook it in the oven. I don't know why, but it's true! The slow cooker version is still pretty darn good, but just know that the oven version is even better.

ingredients:

  • 2 Tbsp. olive oil, divided
  • 2 lb. boneless chuck roast, trimmed and cut into 1 1/2-inch pieces
  • 2 cups chopped onion
  • 2 cups chopped carrots
  • 8 garlic cloves, smashed
  • 2 Tbsp. tomato paste
  • 1 cup dry red wine
  • 1 cup unsalted beef stock
  • 1/3 cup Dijon mustard
  • 1 tsp. kosher salt
  • 1 tsp. freshly ground black pepper
  • 8 oz. cremini mushrooms, quartered (or halved if they're small)
  • 5 large thyme sprigs
  • 2 dried bay leaves
  • Chopped fresh parsley (optional)

instructions:

  1. Preheat oven to 300°F.
  2. Heat a Dutch oven over medium-high heat. Add 1 tablespoon oil to pan; swirl to coat. Add half of beef; cook, turning occasionally, until well browned on all sides, about 8 minutes. Remove beef from pan; repeat procedure with remaining 1 tablespoon oil and remaining beef. 
  3. Add onion and carrots to pan; sauté 3 minutes. Add garlic; sauté 1 minute. Add tomato paste; cook 1 minute, stirring constantly until vegetables are coated. Add wine; cook until wine is reduced by half, about 3 minutes. Stir in beef, stock, mustard, salt, pepper, mushrooms, thyme, and bay leaves. 
  4. Cover and bake at 300°F until beef is very tender, about 2 1/2 hours. Garnish stew with parsley, if desired.

NOTES:

Calories 313; Fat 16g (sat 6g); Protein 23g; Carb 9g; Fiber 2g; Sugars 3g (added sugars 0g); Sodium 516mg
Created using The Recipes Generator

White Chicken Chili with Poblanos

IMG_0876.jpeg

A big pot of chili just screams comfort and goodness. But you don’t always have hours to devote to one, y’know? This chicken chili, with a broth that’s both, well, brothy and slightly creamy, takes only a little more than a half-hour to make. It’s deeply savory and full of flavor, thanks to a few well chosen ingredients. The broth gets its body from pureed beans (it’s not thickened with flour), so it’s gluten free. You’ll be happy you made it whether it’s a cold, damp night or a warm evening—it’s an all-weather chili!

Yield: 8 servings (serving size: about 1 1/3 cups)

White Chicken Chili with Poblanos

prep time: 10 minscook time: 25 minstotal time: 35 mins

This hearty pot of chili comes together from start to finish in only 35 minutes, thanks to a trifecta of smart convenience products: rotisserie chicken, canned beans, and bottled tomatillo salsa. The salsa gives the broth loads of flavor, and all you have to do is twist open the lid. Know that poblano peppers can be tricky: Sometimes they’re as mild as bell peppers, and other times they’re hotter than jalapeños. If yours is particularly spicy (be brave and touch a piece to your tongue), use just one pepper—or go for it with two if you’re a hothead.

ingredients:

2          Tbsp. canola oil

2          cups chopped white onion

2          poblano peppers, seeded and chopped

6          large garlic cloves, minced

2          tsp. ground cumin

1          tsp. dried oregano

4          cups unsalted chicken stock (I used Swanson), divided

1          cup bottled tomatillo salsa (I used Frontera)

1          tsp. kosher salt

1          tsp. freshly ground black pepper

3          (15-oz.) cans unsalted cannellini beans, rinsed, drained, and divided

4          cups shredded boneless, skinless rotisserie chicken, white and dark meat (about 1 lb., 1 small rotisserie chicken)

3/4      cup thinly sliced radishes

1/2      cup thinly sliced green onions

2          ripe peeled avocados, thinly sliced or chopped

1          jalapeño pepper, thinly sliced (optional)

instructions:

1. Heat oil in a large Dutch oven over medium heat. Add onion and poblanos; cook 5 minutes, stirring occasionally. Add garlic; cook until onion is tender, stirring frequently, about 4 minutes. Stir in cumin and oregano; cook 1 minute, stirring constantly.


2. Stir in 3 1/2 cups chicken stock, salsa, salt, black pepper, and bay leaves; bring to a boil. Reduce heat, and simmer 10 minutes. 


3. Meanwhile, combine remaining 1/2 cup stock and 1 can of beans (about 1 1/2 cups) in a blender; process until smooth. Stir bean puree and remaining 2 cans of beans into pan; return to a simmer. Add chicken; simmer 5 minutes. 


4. Ladle about 1 1/3 cups chili into each of 8 bowls; top servings evenly with radishes, green onions, avocados, and jalapeño, if desired.

NOTES:

Calories 357; Fat 12g (sat 2g); Protein 30g; Carb 35g; Fiber 11g; Sugars 2g (added sugars 0g); Sodium 653mg
Created using The Recipes Generator

Lime Shortbread with Cardamom Glaze

IMG_0839.jpg

Well, this post is short, sweet, and simple. No step-by-step photos or instruction needed! The cookies are easy to make and pretty hefty in size; one is plenty big to satisfy a sweet craving.

Yield: 24 cookies

Lime Shortbread with Cardamom Glaze

prep time: 2 hourcook time: 22 minstotal time: 2 hours and 22 mins

This simple slice-and-bake cookie gets all gussied up for the holidays with red and green accents from pomegranate and pistachios. The pomegranate is completely optional and will shorten the shelf life of the cookies, but boy is it pretty! I love kosher salt for these cookies. It gives you delicious little pockets of salty goodness throughout—because a one-note sweet treat without a little salt for balance is, well, flat and boring. Please note that there is no egg in this dough; that's not a mistake. This gives the cookies the most wonderful "short" texture that's absolutely irresistible.

ingredients:

Cookies:
  • 9 oz. whole-wheat pastry flour (about 2 1/4 cups)
  • 1/2 cup powdered sugar
  • 1/4 cup cornstarch
  • 1/2 tsp. kosher salt
  • 1/2 cup unsalted butter, softened
  • 6 Tbsp. canola oil
  • 1/4 cup granulated sugar
  • 1 1/2 tsp. vanilla extract
  • 1 tsp. finely grated lime zest (from 1 lime)
Glaze and Toppings:
  • 3/4 cup powdered sugar
  • 1 1/2 tsp. meringue powder (this helps the glaze set up firmly; find it at craft stores)
  • 1/4 to 3/8 tsp. ground cardamom
  • 4 tsp. water (FYI: I tried this with lime juice and it was just too much)
  • 2 Tbsp. finely chopped pistachios
  • 2 Tbsp. pomegranate arils (optional)

instructions:

  1. To prepare cookies, combine flour, 1/2 cup powdered sugar, cornstarch, and salt, stirring with a whisk.
  2. Place butter in a large bowl; beat with a mixer on medium speed until creamy (about 1 minute). Add oil, granulated sugar, vanilla, and lime zest; beat on medium speed until well blended (about 2 minutes). 
  3. Divide dough in half. Roll each half into a 5-inch-long log. Wrap dough logs separately in plastic wrap; chill for 30 minutes.
  4. Preheat oven to 325°F.
  5. Remove dough logs from refrigerator, and remove plastic wrap. Cut each dough log into 12 slices (reshape log to keep round shape as needed). Arrange cookies on 2 baking sheets lined with parchment paper. Bake at 325°F for 22 - 25 minutes or until cookies are set and barely starting to brown around the edges. Cool cookies completely on pans.
  6. To prepare the glaze, combine 3/4 cup powdered sugar, meringue powder, and cardamom in a small bowl. Add water, and stir until smooth (glaze will be thin). Spread glaze evenly over cookies; sprinkle evenly with pistachios and pomegranate arils, if desired. Let cookies stand at room temperature until glaze is set, about 1 hour. 
  7. If you used pomegranate arils, store the cookies in an airtight container in the fridge for up to 2 days. If you omitted the pomegranate, store the cookies in an airtight container at room temperature for up to 5 days.

NOTES:

Calories 150; Fat 8g (sat 3g); Protein 1g; Carb 19g; Fiber 2g; Sugars 8g (added sugars 8g); Sodium 25mg
Created using The Recipes Generator

Chocolate-Cinnamon Sugar Cookies

IMG_0832.jpg

I just love these spiced chocolate sugar cookies! They taste like Mexican chocolate, with cinnamon warming the sweet chocolate notes. I use just a little bit of cocoa for more of a milk chocolate flavor than a dark chocolate one. See the notes below the recipe card for ingredient/decorating tips.

Yield: 40 cookies (I got 45, but let's say 40 to be safe)

Chocolate-Cinnamon Sugar Cookies

prep time: 2 hourcook time: 20 minstotal time: 2 hours and 20 mins

Since no one in my family likes gingerbread cookies (except me), I decided to create some cookies that look like them and have a little bit of spice to jazz them up. The flavor is reminiscent of Mexican chocolate, with the zip of cinnamon perking up sweet chocolate notes (I use just a little bit of cocoa to create more of a milk chocolate vibe than a dark chocolate flavor).

ingredients:

Cookies
  • 9 oz. whole-wheat pastry flour (about 2 1/4 cups)
  • 1/4 cup unsweetened cocoa powder
  • 1 1/2 tsp. ground cinnamon
  • 1/2 tsp. kosher salt
  • 1/2 cup unsalted butter, softened
  • 1/4 cup canola oil
  • 3/4 cup granulated sugar
  • 1 tsp. vanilla extract
  • 1 large egg
Icing (This will make double of what you'll use to decorate the cookies, but you'll want extra to play with for coloring and playing around with.)
  • 2 cups powdered sugar
  • 4 tsp. meringue powder (see note below)
  • 3 1/2 to 4 1/2 Tbsp. water
  • 1/2 tsp. vanilla extract
  • Food coloring (optional)

instructions:

  1. To prepare cookies, combine flour, cocoa, cinnamon, and salt, stirring with a whisk.
  2. Place butter in a large bowl; beat with a mixer at medium speed until creamy (about 2 minutes). Add oil; beat at medium speed until well combined. Add granulated sugar and 1 teaspoon vanilla; beat until fluffy (about 1 1/2 minutes). Beat in egg. Add flour mixture; beat on low speed until just combined.
  3. Divide dough in half. Roll each half between sheets of plastic wrap to a thickness between 1/8 inch and 1/4 inch (dough will be soft). Place dough, still between plastic wrap, on a baking sheet, and place in freezer for 20 minutes or until firm.
  4. Preheat oven to 350°F.
  5. Remove dough from freezer. Remove plastic wrap from top of 1 dough half. Working quickly, cut dough with 2- to 3-inch cutters of desired shapes. Arrange cookies on a baking sheet lined with parchment paper. Repeat procedure with remaining dough half, placing on another baking sheet lined with parchment paper. Reroll scraps and refreeze to firm up dough. Cut out more shapes until you have 40 to 45 cookies. Bake at 350°F for 10 minutes or until firm and starting to slightly darken around the edges. Cool on baking sheets on a wire rack for 2 minutes. Transfer cookies directly to wire rack to cool completely, about 30 minutes.
  6. To prepare icing, combine powdered sugar and meringue powder in a large bowl. Add 3 1/2 tablespoons water and 1/2 teaspoon vanilla. Beat with a mixer on low speed until just moistened (about 20 seconds); beat on high speed until thick, bright white, and smooth (about 5 minutes). Beat in additional water, 1/2 teaspoon at a time, if needed, to reach desired consistency. Stir in food coloring (see notes below) if desired. Spread or pipe icing evenly over cookies. Let stand at room temperature until icing is completely set (about 1 to 2 hours). Store in an airtight container for up to 5 days.

NOTES:

Calories 96; Fat 5g (sat 2g); Protein 1g; Carb 13g; Fiber 1g; Sugars 7g (added sugars 7g); Sodium 19mg
Created using The Recipes Generator

IMG_0783.jpg

Another critical ingredient for these cookies is meringue powder, which helps the icing set up hard so that you can stack and package the cookies with no worries of destroying your beautiful decorations. You can find it in the baking section of craft stores.

IMG_0809.jpeg

One of my favorite ingredients ever is whole-wheat pastry flour. I’ve touted it before, and I’ll do so here again! Its fine texture works beautifully in all types of baking recipes, and it allows me to make 100% whole-grain treats with great texture. Here’s the kind I use (the house brand from Whole Foods).

Now for the fun part, the decorations. Piping is easy and goes quickly. You can use a piping bag with a #1 or #2 tip (which is what I did), or use a zip-top plastic bag and cut a tiny hole in one corner to pipe from. My piping skills are not very good, but the cookies still look pretty great!

IMG_0819.jpeg

For the trees, I mixed up some natural food coloring (India Tree brand—shown in the photo on the right) to create a deep green color. Yellow + blue = green. To create colored icing, I simply spoon some of the white icing into a small bowl or ramekin and mix in the color with a butter knife. I then use the knife to spread the icing onto each cookie. You can pipe the icing, too, but the knife method works really well for me.

I then gathered up round sprinkles, tiny nonpareils, and edible silver dragées for the designs. You’ll want to spread the green icing over the entire surface of the cookie and then apply your toppings while the icing is still wet. You can apply in either in a random pattern or—my favorite—with tweezers to create strings of lights. Whether you’re a white lights person or a colored lights person, you can make your tree cookies reflect your style.

IMG_0813.jpeg
IMG_0824.jpeg
IMG_0822.jpeg
IMG_0823.jpeg

For the reindeer, I used brown gel food coloring (not natural food coloring, sorry) to create a lighter doe-like color for the deer. I felt that the natural chocolate color was too dark. I spread the brown-tinted icing over the entire surface of the deer, and then each deer got a collar of either small nonpareils or larger round sprinkles, a blue nonpareil for the eye, and a red round sprinkle for a Rudolph nose.

IMG_0810.jpeg
IMG_0812.jpeg
IMG_0825.jpeg

Finally, for the stockings, I started off in a hilarious way. I had some gorgeous fluffy purple glitter that made amazingly beautiful cookies. But then I realized that this purple glitter was not edible—it had been placed in the wrong crafting box! So that stunk… I then proceeded with new stockings. First, I decorated the cuff with white icing that I topped, when still wet, with white sparkling sugar. Once that dried, I covered the rest of the stocking with white icing and topped with red or green sparkling sugar. For the others, I let the white icing dry completely and then brushed on copper and silver luster dust. (I have some eyeshadow brushes that came free with purchase that are perfect for this. No, I never used them with cosmetics. They are for food only!)

IMG_0821.jpeg
IMG_0817.jpeg

You can find all of the decorating supplies at craft stores. They’re a great investment that you can use year after year (I’ve had that luster dust for maybe five years.)

My last bits of advice when you’re decorating Christmas cookies:

  1. If you want to decorate with your kids, you have to let them do their own thing. Let go of your own expectations and let them have fun. (If you want gorgeous cookies for teacher gifts, maybe decorate by yourself after the kiddos go to bed.)

  2. Allow yourself plenty of time to decorate. If this needs to come together in an hour, you’ll drive yourself crazy.

  3. Make sure you have plenty of space to allow the cookies to dry. Once decorated, I place them on either sheet pans or these large plastic platters I have and move them out of reach of my big dog. He has helped himself to food on the table when I’ve turned my back.

  4. Get creative and have fun!

Cranberry-Orange Bread with Salted Pecan Streusel

IMG_0670.jpeg

Cranberry-orange bread always feels like a holiday treat just bursting with winter fruit flavor. It’s a lovely treat to make for yourself or to offer as a gift to teachers, friends, and family. My version is healthier than many you’ll find, made with whole-grain flour and less sugar. See below for a few tips and how-to photos.

Yield: 12 servings

Cranberry-Orange Bread with Salted Pecan Streusel

prep time: 15 minscook time: 50 minstotal time: 65 mins

I adore cranberry-orange bread, but it's often swimming in sugar and made with refined white flour. I worked on this healthier version and absolutely love it. It's moist (sorry, but that's the best word for it!), full of citrus flavor and intermittent pops of cranberry tartness, and crowned with the most delicious salted pecan streusel. Here's the thing, though (yep, there's a thing): I love that streusel so much that I wanted there to be plenty on top of the bread. It's a little heavy, so it sinks down into the batter a bit and prevents the bread from doming. I tried the bread with less streusel and just wasn't as happy with it. So sunken streusel it is!

ingredients:

Bread:
  • 8 oz. whole-wheat pastry flour (about 2 cups)
  • 1 1/2 tsp. baking powder
  • 1/2 tsp. baking soda
  • 1/2 tsp. kosher salt
  • 2/3 cup granulated sugar
  • 1 Tbsp. grated orange zest (from 1 large navel orange)
  • 1/2 cup fresh orange juice (from 1 large navel orange)
  • 1/3 cup whole buttermilk
  • 3 Tbsp. canola oil
  • 1 tsp. vanilla extract
  • 1 large egg, lightly beaten
  • 1 cup chopped fresh or frozen, thawed cranberries (1 cup whole cranberries = about 1 cup chopped)
Streusel:
  • 1/4 cup old-fashioned rolled oats
  • 1/4 cup chopped pecans (no need to pre-toast; they'll toast on top of the bread as it bakes)
  • 3 Tbsp. light brown sugar
  • 2 Tbsp. salted butter, melted
  • 1/4 tsp. kosher salt

instructions:

  1. Preheat oven to 350°F. Line an 8 x 4–inch loaf pan with parchment paper (see tip below). 
  2. To prepare the bread, combine flour, baking powder, baking soda, and salt in a large bowl; stir with a whisk to combine.
  3. Combine granulated sugar, orange zest (it's easier to zest the orange while it's whole, before you cut it and squeeze out the juice), orange juice, buttermilk, oil, vanilla, and egg in a medium bowl; stir well with a whisk to combine. Add wet mixture to flour mixture; stir with a silicone spatula to combine. Fold in cranberries. Spoon batter into prepared loaf pan. 
  4. To prepare streusel, combine oats, pecans, brown sugar, butter, and salt; stir well to combine. Sprinkle evenly over batter.
  5. Bake at 350°F until bread springs back when pressed in center and a wooden pick comes out clean, about 50 - 55 minutes. Cool in pan for 10 minutes. Remove from pan (with parchment paper) and cool on a wire rack.
  6. For mini loaves (I used 3 [6 x 2 1/2–inch] paper baking molds), spoon about 1 cup batter into each of 3 molds. Divide streusel evenly over loaves. Bake at 350°F until bread springs back when pressed in center and a wooden pick comes out clean, about 30 minutes. Cool in paper molds. 

NOTES:

Calories 209; Fat 7g (sat 2g); Protein 3g; Carb 33g; Fiber 3g; Sugars 16g (added sugars 14g); Sodium 144mg
Created using The Recipes Generator

When prepping the loaf pan, line it with parchment paper to make removal much easier. Place the paper down on a surface, place the pan in the middle, and make diagonal cuts from each corner of the paper to the corner of the pan.

IMG_0638.jpeg

This makes it easier to fit the paper into the pan, firmly into the corners.

IMG_0640.jpeg

Next, I call for whole-wheat pastry flour here. It’s an ingredient I absolutely love and use all the time. It’s finer in texture than whole-wheat flour or white-wheat flour, making it ideal for baking projects. Here’s the kind I use:

IMG_0783.jpeg

Last little tidbit. Please take note of my words above about the streusel. There’s a good bit of it.

IMG_0643.jpeg

And that gives you excellent coverage over the batter:

IMG_0645.jpeg

Trust me, you wouldn’t want any less! The bread is delicious just as it is. It’s just a little less poofy, that’s all.

IMG_0646.jpeg

Slow-Cooker Pork with White Beans and Kale

IMG_0757.jpeg

Well, we’re officially in the busiest month of the year—or at least it’s the busiest for me and every other human I know. Among all the fun social commitments, errand-running, holiday shopping, cookie baking, and cramming in of end-of-year work that just has to get done, there’s little time for everyday cooking. And that’s where the good ol’ slow cooker comes in handy. To be completely honest, I’m not the biggest fan of the slow cooker … until life gets insane enough for me to admit that it really is pretty darn useful. Let it do the work for you, making this comforting, delicious, nutritious (check out that fiber!) meal that will feed you and your family for multiple nights. There’s very little prep involved, and then the slow cooker just does its thing while you go about doing your thing. The pork ends up meltingly tender, and the beans are the creamiest ever. If only everything in December could be this easy and this satisfying!

Yield: 12 (serving size: about 4 oz. pork and 2/3 cup bean mixture)

Slow-Cooker Pork with White Beans and Kale

prep time: 14 minscook time: 7 hour and 10 minstotal time: 7 hours and 24 mins

When your week is insanely busy, you need a meal that will cook itself while you're at work—and then feed you and your family another couple nights of delicious leftovers. This is that meal. It's dead simple, delivering supreme comfort with very little effort. The beans, which go into the slow cooker dry (because who can remember to soak them ahead?) absorb all the delicious porky flavors and cook up to an incredibly creamy texture. Enjoy leftovers as they are, or mash the beans with a little hot sauce and use as a tostada topping or taco filling with the pork; just add salsa to perk up the flavor.

ingredients:

  • 2 1/2 tsp. kosher salt, divided
  • 1 tsp. black pepper
  • 1 tsp. ground cumin
  • 1 tsp. ground coriander
  • 1 (4 1/2-lb.) bone-in pork shoulder roast (Boston Butt), trimmed (for me, the trimmed weight was 4 lb.)
  • 2/3 cup water
  • 1 lb. dried Great Northern beans (no need to presoak)
  • 4 cups unsalted chicken stock (1 [32-oz.) carton)
  • 6 garlic cloves, peeled and smashed
  • 2 oregano sprigs (or 1/2 tsp. dried oregano)
  • 2 bay leaves
  • 1 dried ancho chile, stemmed (optional)
  • 1 large bunch curly kale (about 12 oz.), stemmed and torn into pieces

instructions:

  1. Heat a large nonstick skillet over medium-high heat. Combine 1 teaspoon salt, pepper, cumin, and coriander. Rub over all sides of pork. Add pork to pan; cook until well browned, turning occasionally to brown all sides, about 12 minutes. Place pork in a slow cooker. Add water to hot skillet, scraping bottom of pan to release browned bits. Pour water over pork.
  2. Arrange beans around pork in slow cooker. Pour chicken stock over beans. Add garlic, oregano, bay leaves, and chile, if using, to slow cooker. Cover and cook on LOW until pork and beans are very tender, about 7 to 8 hours. Remove and discard bay leaves and oregano sprigs. (You can chop or mash the ancho and stir into the beans if desired.)
  3. Increase slow cooker heat to HIGH. Pile kale on top. Cover and cook 10 minutes or until kale wilts. (I like my kale a little chewy and still bright green; if you like it more tender, you'll need to cook it longer.) Sprinkle kale with remaining 1 1/2 teaspoons salt; gently stir to combine with beans. 

NOTES:

Calories 435; Fat 19g (sat 7g); Protein 38g; Carb 27g; Fiber 9g; Sugars 2g (added sugars 0g); Sodium 579mg
Created using The Recipes Generator

This recipe is so simple that there’s not much to show, step- or technique-wise. I do recommend buying a bone-in pork roast, as the bone always seems to add more flavor and helps to keep the pork moist. And please, please, please brown it before it goes into the slow cooker. That step builds deep, savory flavor and is more than worth the few minutes it takes. Remember, brown = flavor. I don’t add any oil to the skillet when I brown the roast (you really don’t need it).

IMG_0680.jpeg

As for the beans, they go into the slow cooker dry. They cook to creamy perfection over the long, slow simmer, picking up all the yummy pork flavor, as well as that of the broth and the other flavorings:

IMG_0681.jpeg

Well, I forgot to show the garlic, but garlic goes in with the beans, along with bay leaves, oregano sprigs (or dried oregano), and an optional ancho chile. I love what the ancho adds—no real heat but instead richness and depth, with a hint of bitterness. I fished it out before dishing this up for the kids. But I sort of mashed it into my serving. Delicious!

IMG_0683.jpeg

That’s it! That’s all it takes to make a warm, comforting, hearty, big-batch meal that will pull you through the busiest December day.

Herby Buttermilk Ranch Dressing

IMG_0622.jpeg

Everyone needs a good recipe for great ranch dressing, right? This one is easy, fresh, and packed with flavor. It’s really good served very cold—either draped over crisp greens or as a dip for veggies. My current favorite way to have it is shown above: a simple iceberg (yes!) salad with sliced grape tomatoes and bacon. Simple can be so good.

Yield: 8 servings (serving size: 2 tablespoons)

Herby Buttermilk Ranch Dressing

prep time: 10 minscook time: total time: 10 mins

Confession: I like ranch dressing. Not the bottled stuff, which I think is pretty bland. No, I mean homemade buttermilk ranch. I like it loaded with fresh herbs and with a little bite from fresh garlic, which is what makes it so good. I also like it served very cold over equally cold crisp greens like romaine (when it's not being recalled), Little Gem lettuce, or iceberg lettuce, which I've recently rediscovered. The recipe here is for the dressing alone; the salad shown is just a serving suggestion. You might want to go ahead and double the recipe; it's a good thing to keep on hand.

ingredients:

  • 1/2 cup whole buttermilk
  • 1/2 cup mayonnaise (I use Duke's; I'm Southern...)
  • 2 Tbsp. chopped fresh chives
  • 1 Tbsp. chopped fresh dill
  • 1 Tbsp. apple cider vinegar
  • 2 tsp. chopped fresh thyme
  • 1/2 tsp. kosher salt
  • 1/2 tsp. freshly ground black pepper
  • 1 small garlic clove, grated on a Microplane

instructions:

  1. Place all ingredients in a medium bowl; whisk until well combined. I like to chill mine until very cold before serving, about an hour or so.

NOTES:

Calories 111; Fat 12g (sat 2g); Protein 1g; Carb 1g; Fiber 0g; Sugars 1g (added sugars 0g); Sodium 183mg
Created using The Recipes Generator

Creamy Sausage and Spinach Lasagna

IMG_0613.jpeg

I certainly love a good red-sauce lasagna—but a creamy white-sauce version? Oh yeah, I’ll take that any day. My Creamy Sausage and Spinach Lasagna is rich and indulgent–tasting, yet clocks in at fewer than 400 calories per serving. The sauce uses a combo of flour-thickened milk and chicken stock to keep things light, and chicken Italian sausage pulls its weight, flavor-wise, without loading on calories and fat. (Scroll below recipe card for photo step-by-steps on layering.) Hooray for lasagna night!

Yield: 6 servings

Creamy Sausage and Spinach Lasagna

prep time: 35 minscook time: 42 minstotal time: 77 mins

How 'bout a plate of cheesy, starchy, creamy comfort ... that won't leave you feeling awful after you eat it? That's what this white lasagna offers. It hits all the high notes of comfort food goodness but keeps things a little lighter than the typical versions you'll see. You won't have to resign the rest of your night to recovering from lasagna, if you know what I mean. It's packed full of garlicky spinach, too, and the thin lasagna noodles do something really rather lovely—they don't soak up much sauce, so the lasagna stays creamy-wonderful. My husband, who typically doesn't like lasagna, asked to pack up leftovers to take to work the next day. But then the kids ate what would have been the leftovers. Teenagers...

ingredients:

  • 9 oz. raw chicken Italian sausage (with casings removed, about 3 links)
  • 1 Tbsp. canola oil
  • 5 garlic cloves, minced
  • 1 lb. fresh spinach
  • 1 1/2 cups 2% milk
  • 1/3 cup all-purpose flour
  • 1 cup unsalted chicken stock (such as Swanson)
  • 1 bay leaf
  • 1/2 tsp. freshly ground black pepper
  • 1/8 tsp. kosher salt
  • 2 oz. Parmigiano-Reggiano cheese, grated (about 1/2 cup packed)
  • Cooking spray
  • 8 oven-ready lasagna noodles
  • 6 oz. shredded low-moisture, part-skim mozzarella cheese (about 1 1/2 cups)
  • Chopped parsley (optional)

instructions:

  1. Preheat oven to 375°F.
  2. Heat a large nonstick skillet over medium-high heat. Add sausage to pan; cook until browned, stirring to crumble, about 5 minutes. Remove sausage from pan. (Do not wipe pan clean.)
  3. Add oil to pan; swirl to coat. Add garlic; cook 1 minute, stirring constantly. Gradually add spinach, tossing with tongs until spinach wilts, about 3 minutes total. Spoon spinach mixture into a strainer; press with back of a spoon to remove excess moisture. (Do not squeeze spinach dry in a towel, as this will make it so dry that it absorbs all of the cheese sauce. Trust me; I found out the hard way.)
  4. Combine milk and flour, stirring with a whisk until smooth. Pour milk mixture and chicken stock into skillet; add bay leaf. Bring to a boil over medium heat, stirring frequently with a whisk. Simmer until thickened. Remove from heat, and stir in pepper, salt, and Parmigiano-Reggiano cheese. 
  5. Coat an 8-inch square glass baking dish with cooking spray. Spread 1/2 cup sauce in bottom of dish. Top with 2 noodles. Sprinkle one-third of sausage over noodles, then top with one-third of spinach. Sprinkle with 1/3 cup mozzarella. Top with 1/2 cup sauce. Repeat layers twice (2 noodles, one-third of sausage, one-third of spinach, 1/3 cup mozzarella, and 1/2 cup sauce). Top final layer with remaining 2 noodles. Spread remaining sauce over noodles, and sprinkle with remaining 1/2 cup mozzarella. Cover pan with foil coated with cooking spray. Bake at 375°F for 40 minutes. 
  6. Uncover pan. Heat broiler to HIGH. Broil lasagna until browned on top, about 2 minutes. Sprinkle with parsley, if desired.

NOTES:

Calories 376; Fat 16g (sat 7g); Protein 27g; Carb 33g; Fiber 4g; Sugars 4g (added sugars 0g); Sodium 720mg
Created using The Recipes Generator

This lasagna does involve a little bit of prep: browning the sausage, wilting the spinach, making the sauce, and shredding the mozzarella (seriously, please shred it yourself from a block; it’ll melt smoother and be creamier). Before you start layering, gather all the components together:

IMG_0574.jpeg

And then rearrange them in order of the way you’ll layer them in the pan. Then spread 1/2 cup sauce in the bottom of the baking dish…

IMG_0575.jpeg

And top with two of the lasagna noodles.

IMG_0579.jpeg

Then sprinkle over one-third of the cooked sausage.

IMG_0580.jpeg

Top with one-third of the spinach.

IMG_0581.jpeg

And then 1/3 cup of the mozzarella.

IMG_0582.jpeg

Spread 1/2 cup sauce over all that.

IMG_0584.jpeg

Repeat those layers twice, and then top with 2 more noodles and the rest of the sauce.

IMG_0587.jpeg

And finish with the rest of the mozzarella cheese. Then cover the dish with foil and bake at 375°F for 40 minutes.

IMG_0588.jpeg

At that point, the lasagna will be done, but just a little pale. See?

IMG_0595.jpeg

But then pop it under the broiler for a few minutes (and top with parsley), and wow—hubba hubba!

IMG_0601.jpeg

Cinnamon-Apple Snack Cake

IMG_0378.jpeg

I’m trying to get ahead for Thanksgiving. My kids are out of school the entire week, and I’ll happily have a houseful of extended family, too. And that, of course, includes my dad, who suffers from celiac disease. I’m always looking for good gluten-free recipes for him—especially desserts, as he has quite a sweet tooth. I wanted a casual cake that I could have on hand for general snacking but that would also be good enough to put out with the holiday feast. And I got there with this recipe. I cannot even express how pleased I am with this cake; it’s one my favorite desserts I’ve ever created, gluten-free or not. My kids agree: They even asked to have it at their birthday party last week! (We ended up opting for something else, but still—they requested it!) Keep reading below the recipe card for some tips and process photos!

Yield: 12 servings

Cinnamon-Apple Snack Cake

prep time: 25 minscook time: 28 minstotal time: 53 mins

I am so happy with how this cake turned out! It comes together in one bowl, and it's moist, tender, and absolutely full of apple flavor. The key is to use Honeycrisp apples, which perfume the whole pan and work some real magic: The batter smells like fresh-pressed cider, and the whole cake tastes as if you somehow crammed the essence of 500 apples into it. My kids went bonkers for it. Connor, in all earnestness, put his hand on my shoulder and said, "Mom. It's really, really good." I can't ask for more than that.

ingredients:

  • 7 oz. (about 2 cups) almond flour
  • 2 3/4 oz. (about 1/2 cup) gluten-free all-purpose flour (I used King Arthur)
  • 2 1/2 tsp. ground cinnamon
  • 2 tsp. baking powder
  • 1/2 tsp. baking soda
  • 1/4 tsp. table salt
  • 1/8 tsp. ground cloves
  • 2 large eggs
  • 1/2 cup low-fat buttermilk
  • 1/3 cup honey
  • 1 1/2 tsp. vanilla extract, divided
  • 1 1/2 cups peeled, shredded Honeycrisp apple (about 1 large [10-12 oz.] apple)
  • 4 oz. 1/3-less-fat cream cheese, softened
  • 6 oz. (about 1 1/2 cups) powdered sugar

instructions:

  1. Preheat oven to 350°F. 
  2. In a medium bowl, combine the flours, cinnamon, baking powder, baking soda, salt, and cloves; stir well to combine. Make a well in center of dry ingredients, and crack eggs into the well. Stir eggs to lightly beat them, then stir in buttermilk, honey, and 1 teaspoon vanilla. Stir mixture well to combine. Fold in shredded apple. Spoon mixture into an 8-inch square metal baking pan coated with cooking spray.
  3. Bake at 350°F for 28 minutes or until a few moist crumbs cling to a wooden pick inserted in center of cake. Cool cake, in pan, on a wire rack.
  4. Place cream cheese and remaining 1/2 teaspoon vanilla in a medium bowl. Beat with a mixer at medium speed until fluffy, about 1 minute. Beating at low speed, gradually add powdered sugar; beat just until combined. Spread frosting over cooled cake.

NOTES:

Calories 261; Fat 12g (sat 2g); Protein 6g; Carb 35g; Fiber 3g; Sugars 27g (added sugars 23g); Sodium 133mg
Created using The Recipes Generator

As I mentioned above, I needed a gluten-free dessert for my dad—and I wanted one that everyone else would love, too. I was unwilling to settle for anything that folks would say was good for a gluten-free cake. That would not be good enough. Thankfully, after a little trial and error, I got there. This cake is just flat-out GOOD. It’s gluten-free, relying on almond flour and gluten-free all-purpose flour (also make sure your baking powder is gluten-free). This is the a-p flour I used:

IMG_0257.jpeg

A little bit of this gluten-free a-p flour lightens the texture of the almond flour, giving the cake a moist, tender texture. (Almond flour alone would produce a dense cake.) Next, the apple variety you use is crucial. And I contend that the only choice is Honeycrisp. It gives a ton of concentrated apple-y flavor, much more than other varieties. I originally tried chopping the apple, but it remained a little too crunchy in the finished cake. So I switched to shredding the apple, and holy cow did that work well! The little apple shreds melt into the batter and distribute the flavor more thoroughly into every bite.

IMG_0272.jpeg

After the cake bakes, make sure to allow it to cool completely. If it’s warm when you top with the icing, you may tear off the tender top layer of the cake as you try to spread, getting crumbs all in the icing. (You may still get a few crumbs in there with a cooled cake, but only a few.)

IMG_0370.jpeg

Use a sharp, thin knife to cut the cake. It’s so tender that it’s a little tricky to cut—not a bad problem if you ask me! And one of the best things about a snack cake is that you can just keep it in the pan and serve straight from there. (Keep leftovers in the fridge since there’s dairy in the frosting.)

IMG_0379.jpeg

Hearty Cabbage and Sausage Soup

IMG_0356.jpg

If you look out on the ol’ interwebs, you’ll find lots of recipes similar to this one (it’s a pretty classic soup). Many include potatoes (mine doesn’t) and lots more sausage than I choose to use. I keep an eye toward sodium and go with only 12 ounces of kielbasa. The Target near my house sells 12-ounce packages of it (I don’t remember the brand), and it’s more than plenty to flavor the whole big pot of soup.

Well, folks, this veggie-loaded soup is just so easy and straightforward that I don’t have any technique or process photos—none needed! All you need is the recipe card. And maybe a side of cornbread. Enjoy!

Yield: 8 (serving size: about 1 3/4 cups)

Hearty Cabbage and Sausage Soup

prep time: 20 minscook time: 41 minstotal time: 61 mins

This humble soup is always on repeat at the Pittman house. I almost thought that it might be too simple to post, but since we love it so much, I figured someone else might love it, too. It's perfect on a chilly night—piping hot and brothy, comforting and full of veggies. It doesn't hurt that the kids love it (and ask for reheated leftovers for school-day breakfasts!) and that the ingredients are pretty inexpensive. It makes almost a gallon, so use a large Dutch oven. The soup holds well for up to three days (and reheats beautifully), but I wouldn't recommend freezing it—the cabbage would get too mushy when the soup thawed. No step-by-step technique photos needed for this recipe: It's just that easy to make!

ingredients:

  • 2 Tbsp. olive oil
  • 2 1/2 cups chopped white onion (about 1 large onion)
  • 1 1/2 cups thinly sliced celery (about 3 large stalks)
  • 4 garlic cloves, minced
  • 4 large carrots, peeled and thinly sliced
  • 12 oz. kielbasa or other smoked sausage, thinly sliced into rounds
  • 1 medium head green cabbage (about 2 1/2 lb.), cored and coarsely chopped
  • 4 cups unsalted chicken stock (such as Swanson)
  • 3-4 cups water
  • 1 Tbsp. fresh or 1 tsp. dried thyme leaves
  • 2 bay leaves
  • 1 (14.5-oz.) can fire-roasted diced tomatoes, undrained
  • 1 tsp. black pepper
  • 1/2 tsp. kosher salt
  • 6 oz. fresh baby spinach

instructions:

  1. Heat oil in a large Dutch oven over medium-high heat. Add onion, celery, and garlic; sauté 5 minutes. Stir in carrots and kielbasa; sauté 4 minutes or until sausage begins to brown.
  2. Pile cabbage into pan. Pour chicken stock and enough water to mostly cover cabbage (3-4 cups) over cabbage. Gently stir in thyme and bay leaves, then stir in tomatoes, pepper, and salt. 
  3. Bring to a boil; reduce heat, cover, and simmer for 40 minutes or until cabbage is tender. Uncover and stir in spinach; cook 1 minute or until spinach wilts.

NOTES:

Calories 253; Fat 15g (sat 4g); Protein 10g; Carb 22g; Fiber 7g; Sugars 10g (added sugars 1g); Sodium 684mg
Created using The Recipes Generator